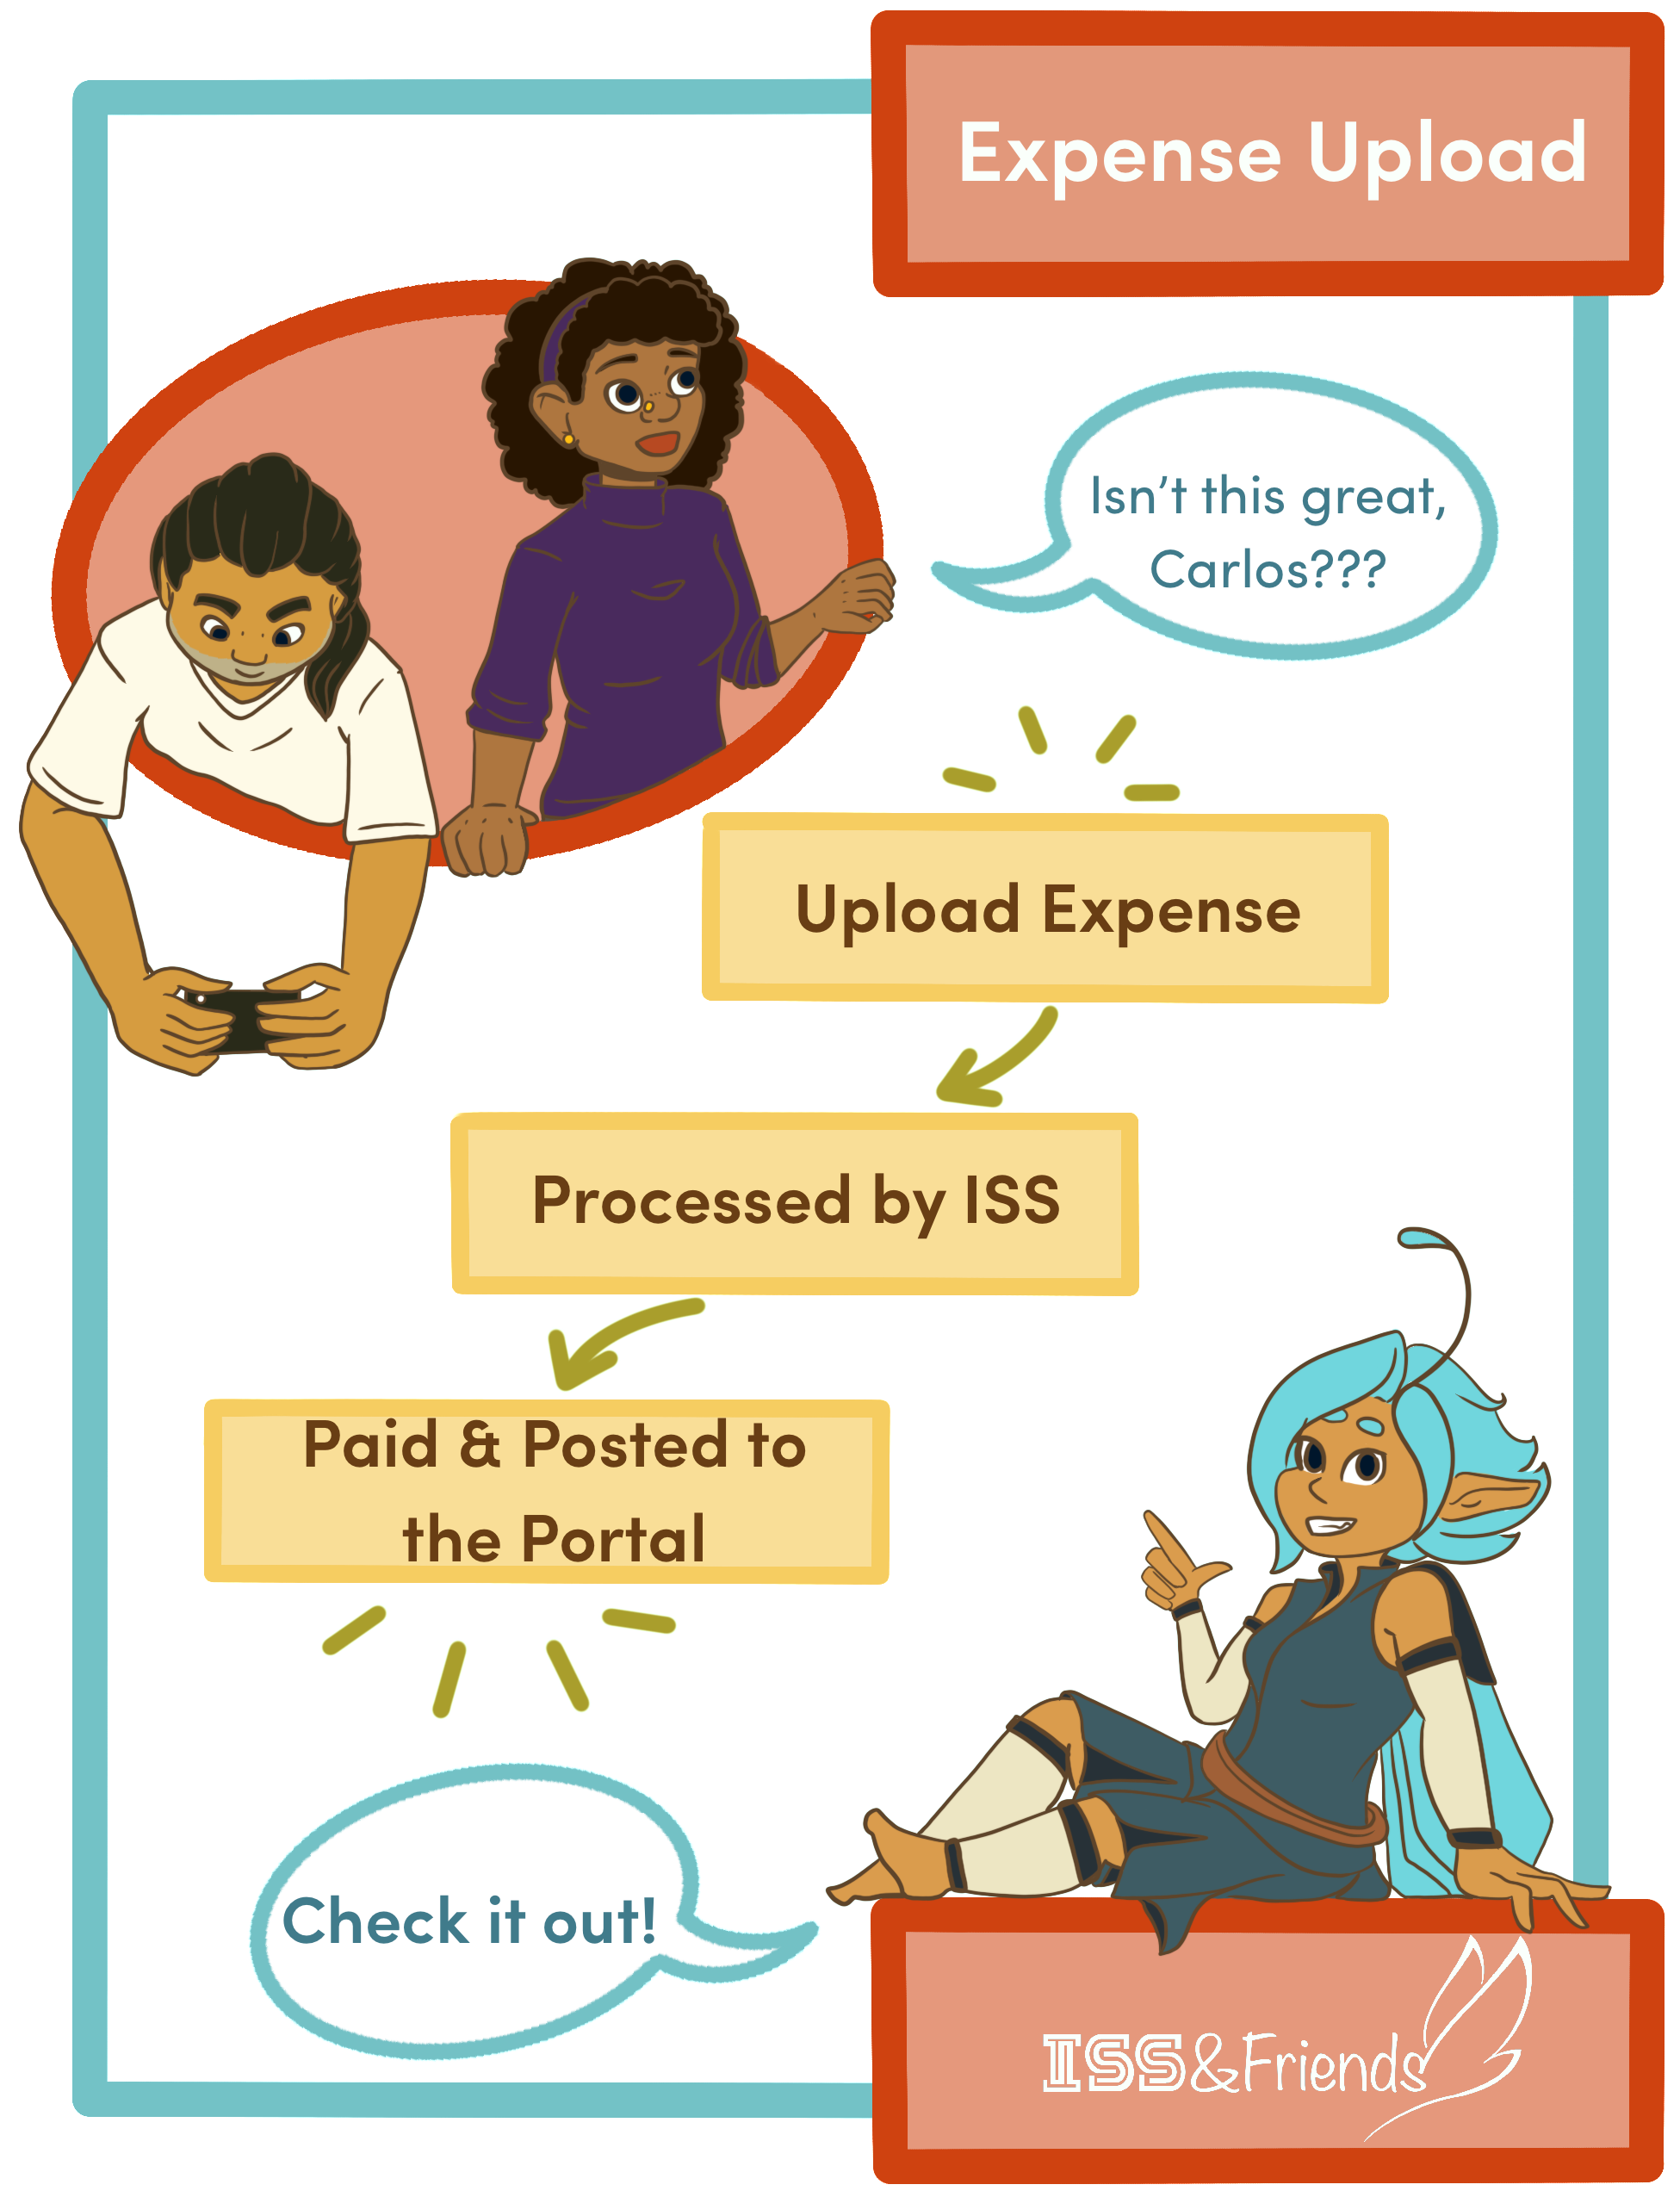
Electronic Expenses
Information about submtting expense reimbursements via the ISS Portal.
- Expense Upload Guide
- Uploading An Expense
- Suggestions For Capturing a Quality Scan Image
- Uploading Multiple Images from a Mobile Device
- Expense Submission Deadlines
- Viewing Your Expense Submissions
- Expense Submission Form 1.5 Updates Effective 03/07/25
- Expense Submission Form Changes Effective 09/12/24
- Staff Activity Fee Itemized Receipts and Proof of Payment
Expense Upload Guide
Uploading An Expense
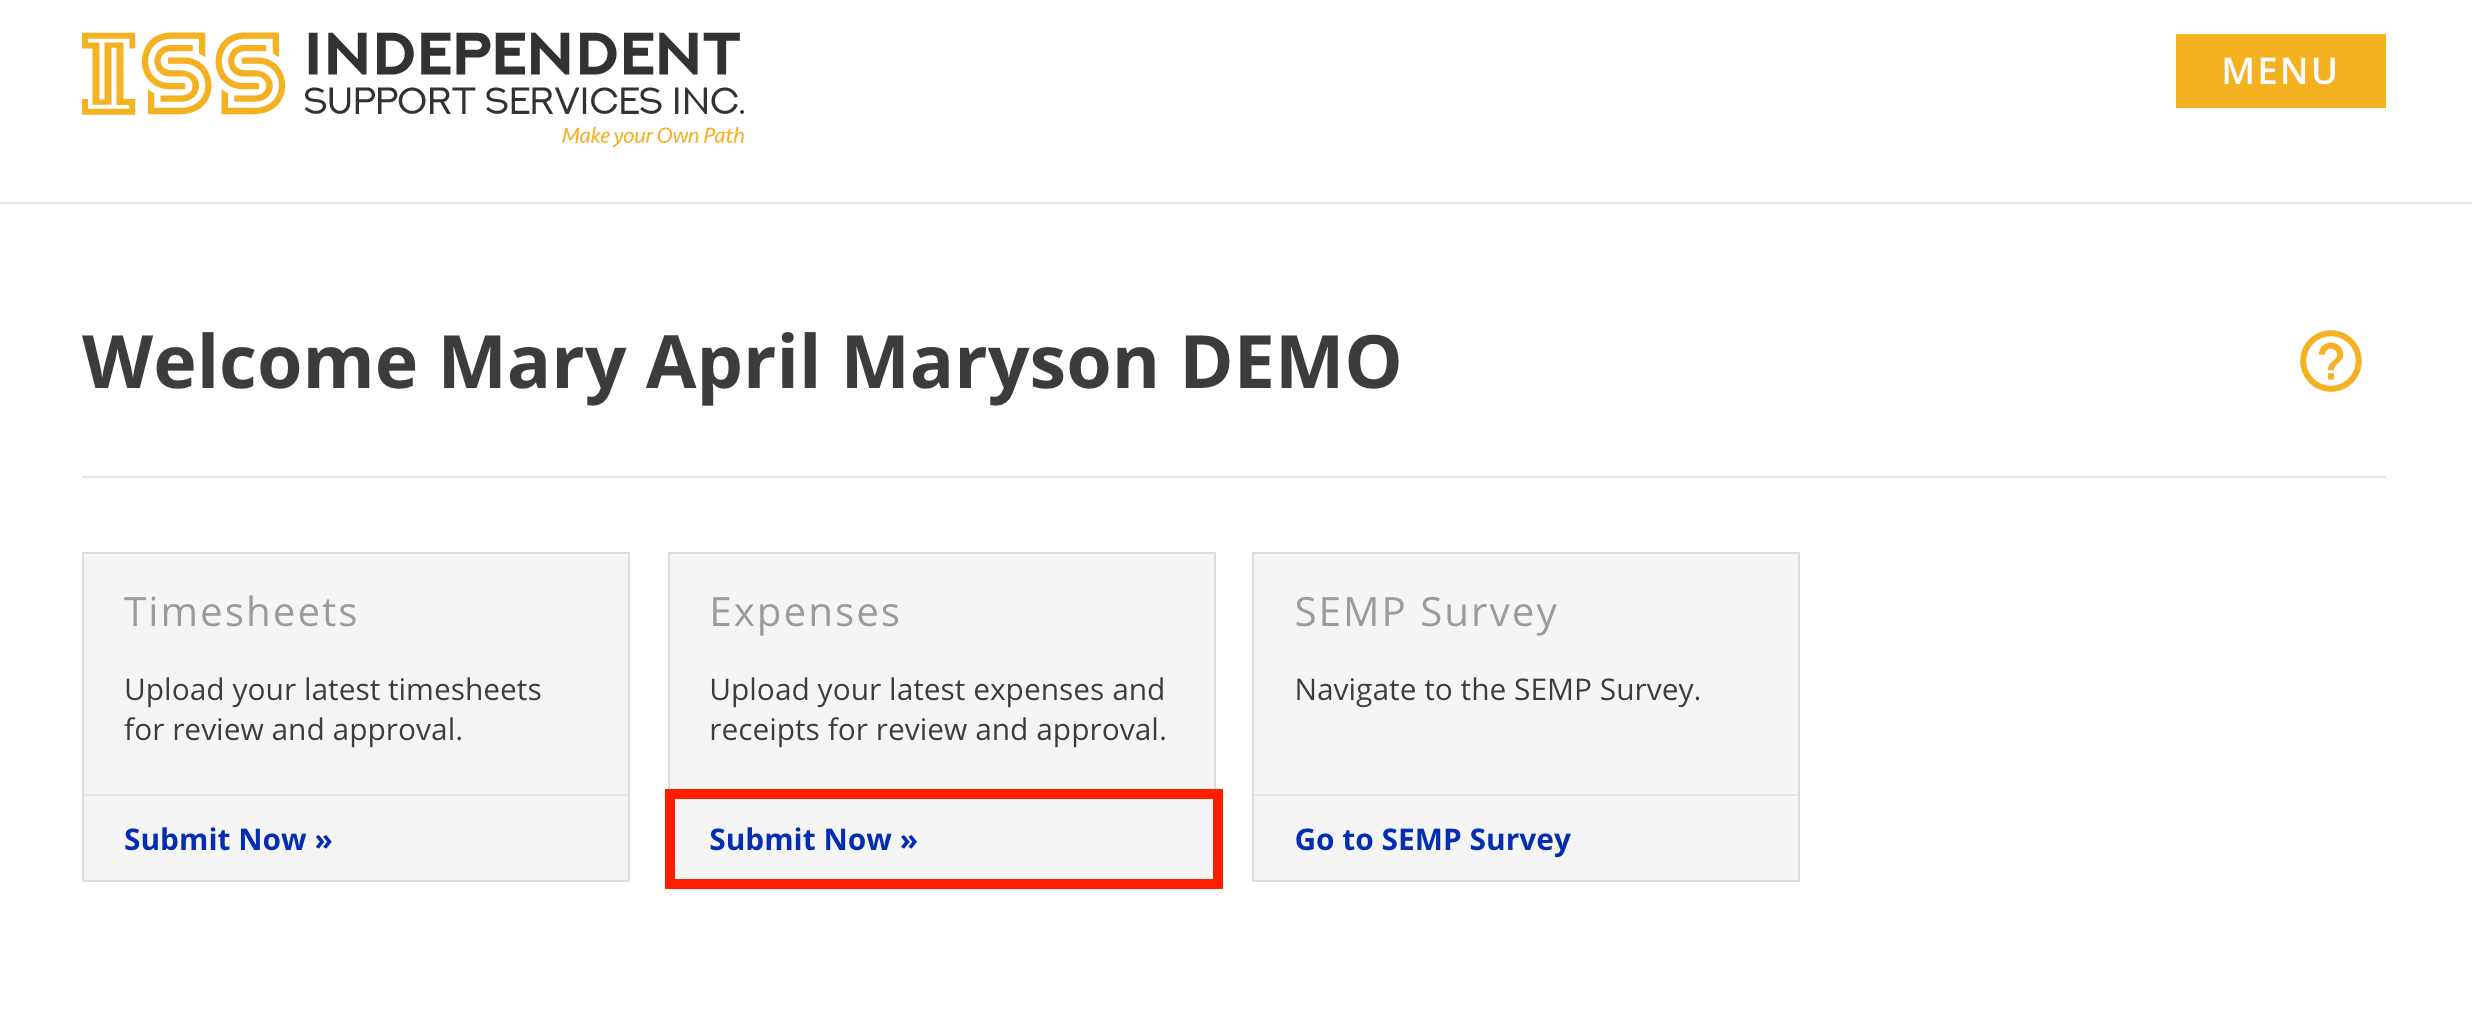
There are multiple ways to access the Submit Expense form.
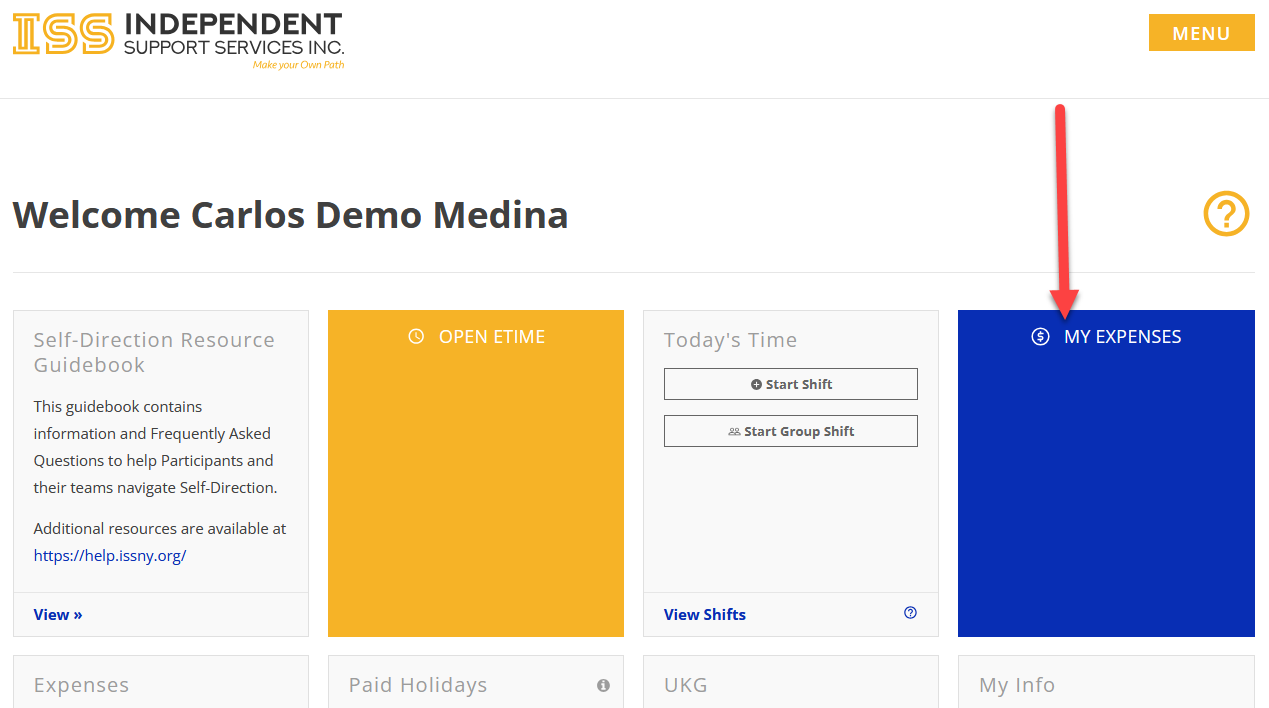
- From the Home page of the portal, click Submit Now » in the Expenses tile.
- When viewing an individual in the Staff Dashboard, click Submit Expense at the top

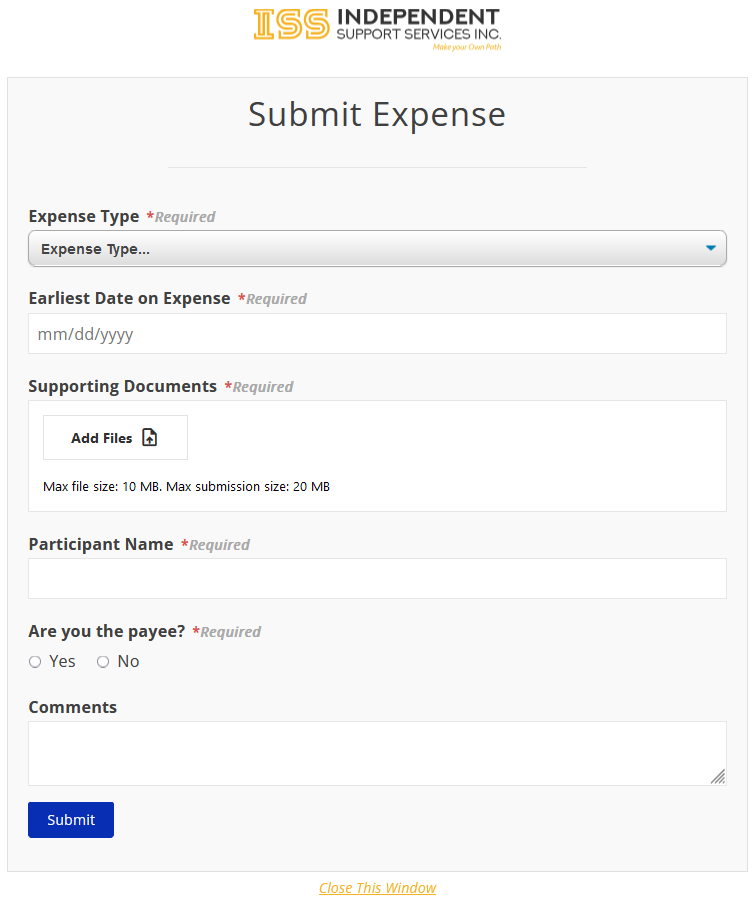
Submitting an Expense:
1. Complete the form.
-
- First Name, Last Name, and Email are auto-populated when accessed through the portal.
- Phone Number and Comments are optional. All other fields are required.
- Allowed file types: heic, jpeg, jpg, gif, png, pdf
- Each file cannot exceed 100 MB.
- Each submission cannot exceed 250 MB.
- Each submission cannot exceed 30 files.
Note: Each file being uploaded must have a unique file name. If more than one file has the same exact name, they will overwrite each other.
 2. Click Submit.
3. You will receive a confirmation message on the screen and a confirmation email to the email address provided on the form.
4. ISS will review and process the submission. Please retain the email confirmation as your proof of submission.
Note: Unlike Timesheet Uploads, Expense Uploads are not viewable on the Portal until processing is finished.
Updated 08/14/25.
Suggestions For Capturing a Quality Scan Image
Regardless of device, make sure to scan your expenses in a well-lit area.
For iOS Devices
There are several apps available on the App Store you can use to create a scan using your iPhone’s camera. This can also be done natively using the Notes app:
- Open Notes.
- Create a new note.
- Tap the camera icon, then tap Scan Documents.
- Position your expense in the camera’s view.
- Capture the image.
- Adjust the corners as needed.
- Tap Keep Scan.
- Tap Save.
- Tap the Share icon.
- (10)Tap Save to Files.
- (11)Choose a location to which to save the file. You will select the document from this location when you upload the expense.
To set your iOS Device to use the JPEG format
By default, your iOS device may take pictures and scans in the HEIC format. We accept HEIC image files, but they may cause issues when uploading to the Portal as they are not as compatible as the JPEG format. For instructions on how to set your iOS device to use JPEG, please follow the guide found here.
For Android Devices
There are several apps available on the Google Play store, including Clear Scan and Microsoft Office Lens, both of which are free. You can use one of these to scan your expenses and save them to your device to upload in the portal. You can also use Google Drive, which comes pre-installed on most Android devices:
- Open the Google Drive app on your device.
- Tap the “+” button.
- Tap Scan.
- Follow the prompts to scan, crop, and save the image.
Updated 03/21/25.
Uploading Multiple Images from a Mobile Device
iOS (iPhone)
If you are using iOS (iPhone) to upload expense images, please note that if you use the "Take Photo or Video" option, you will only be able to upload a single image. Due to the way iOS works, if you were to use this option multiple times, the new photo will always replace and delete the previous photo you took.
If you would like to upload multiple images from your iPhone, please take pictures of the documents using the Photo app then select "Photo Library". At the Photo Library screen, click the images you want to upload. Once all images are selected, click Add to complete image selection.
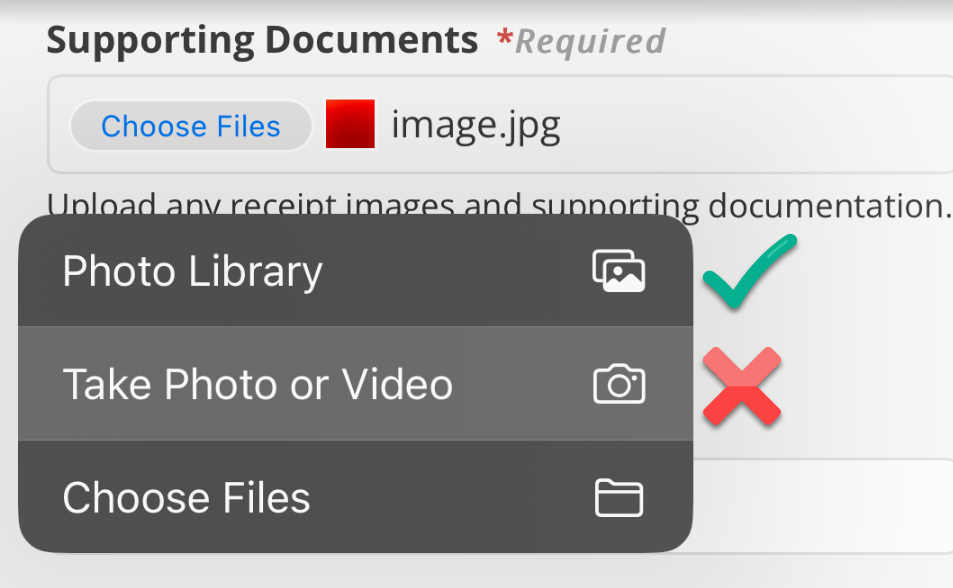
NOTE: Accounts Payable would prefer scanned images over photos.
Android
If you are using an Android device to upload expense images, please note that if you use the "Camera" option, you will only be able to upload a single image. Due to the way Android works, if you were to use this option multiple times, the new photo will always replace and delete the previous photo you took.
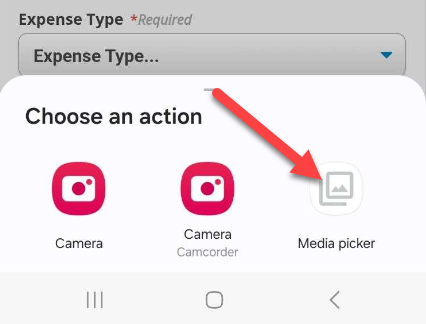
If you would like to upload multiple images from your Android device, please take pictures of the documents using the Photo app then select "Media Picker". At the Media Picker screen, click the images you want to upload. Once all images are selected, click Add to complete image selection.
NOTE: Accounts Payable would prefer scanned images over photos.
Updated 03/21/25.
Expense Submission Deadlines
Each month's expenses must be submitted to Accounts Payable within 30 days of the end of said month.
Medicaid only allows ISS 90 days to receive, review, pay and bill for any claim.
In an effort to meet Medicaid standards, we will be holding to the 30-day deadline for expenses which means we cannot guarantee payment for anything received after the 30-day mark.
Example: Expenses being submitted for July should be submitted no later that August 30th. (30 days after the end of July)
Make sure to save your originals and confirmation emails! We recommend saving a copy of any forms, emails, and/or receipts submitted at least until you have received the reimbursement.
Updated 03/21/25.
Viewing Your Expense Submissions
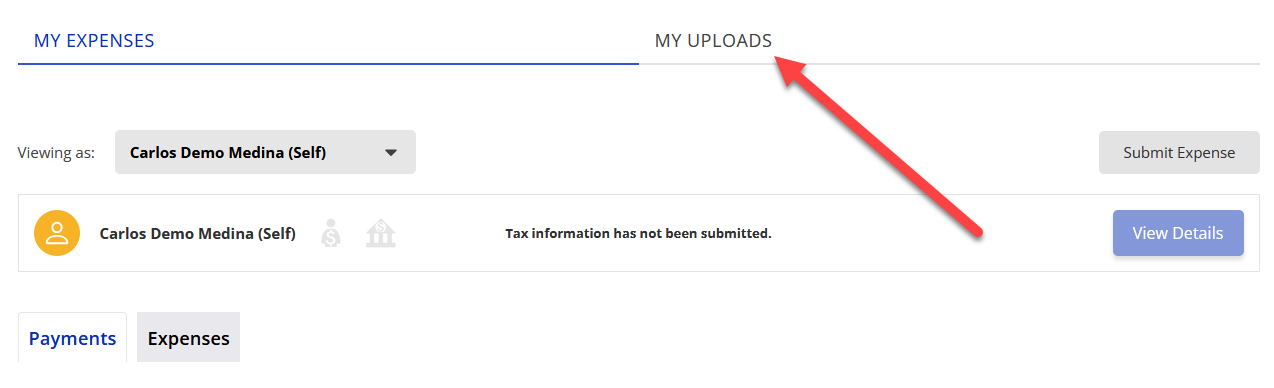
To see what expenses you uploaded via the Portal, log in and go to your My Expenses page.
On the My Expenses page, click the My Uploads tab on the right.
The My Uploads page will load and display a list of the expenses you have uploaded via the Portal.
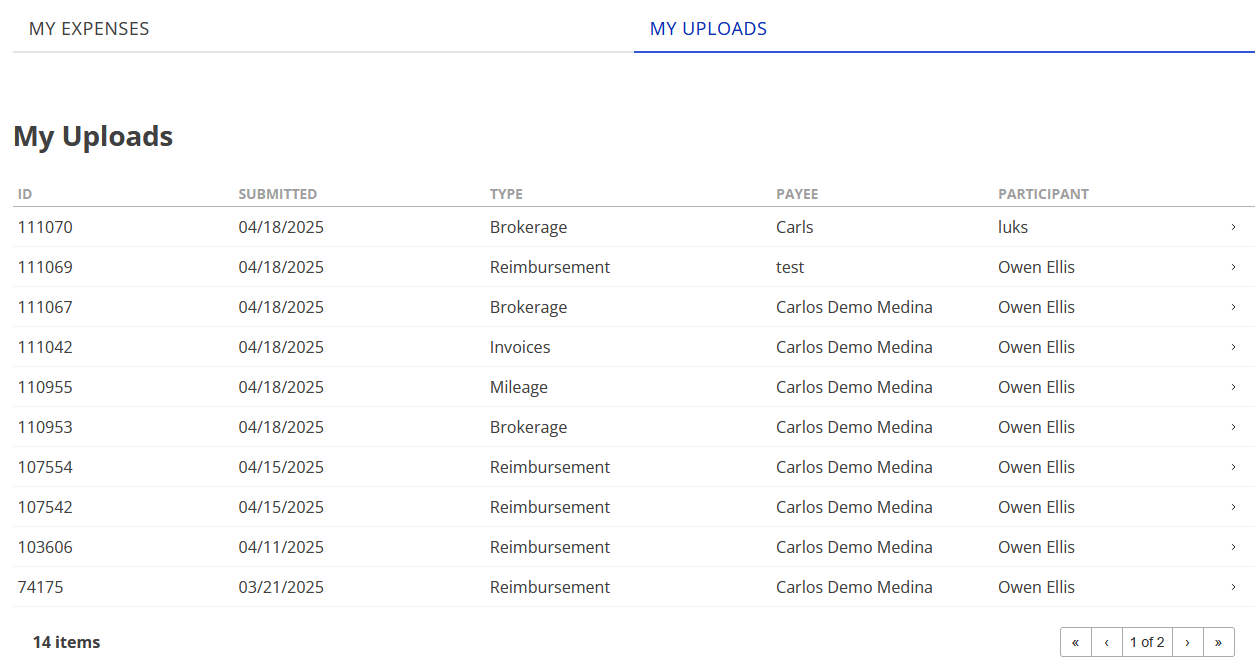
When you click on an expense in the list, you will be shown more information, including the documents you uploaded.
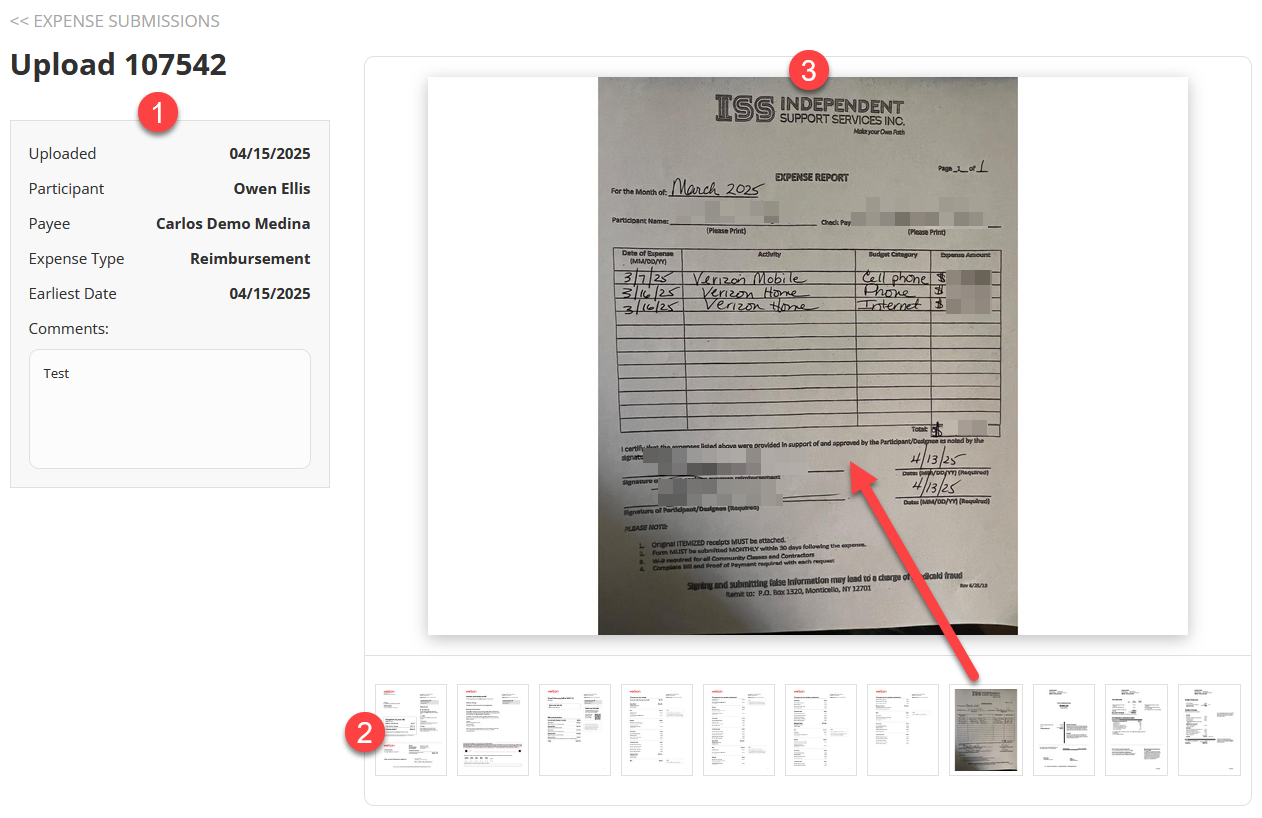
- On the upper left, you will find the Upload ID of your expense submission and below that the details you provided when you uploaded the expense: the Uploaded date, the Participant, the Payee, the Expense Type, the Earliest Date on the expense, and any Comments you entered.
- Along the bottom right, you will find thumbnails of all the documents you uploaded.
- If you click on a thumbnail, that document will be displayed in the window on the upper right.
FAQ
What is my expense submission's status?
This will not show you your submission's status. That is a feature that is coming in the future.
When will my expense submission show in this list?
Your upload will be listed immediately after your expense submission completes. If you have the list already open in another browser tab / window, you will need to hit refresh.
What if I don't see my expense submission in the list?
If you don't see your submission in the uploads list, then we didn't receive it. Please resubmit it.
What if I don't see one or more of my documents in my submission?
If you don't see a document, then we didn't receive it. Please resubmit just the missing document and include a comment so Accounts Payable can connect it with your other submission. Do not resubmit everything as it might then be mistaken for a duplicate.
Do I still have to include the Expense Report / Cover Sheet?
Yes, that is still a required document to be included with all expense submissions.
What if I have questions about my expense submission?
Any questions about your expense submission or reimbursement should be directed to Accounts Payable via finance@issny.org. Please keep in mind that all expense submission policies and deadlines still apply.
Created 04/18/25.
Expense Submission Form 1.5 Updates Effective 03/07/25
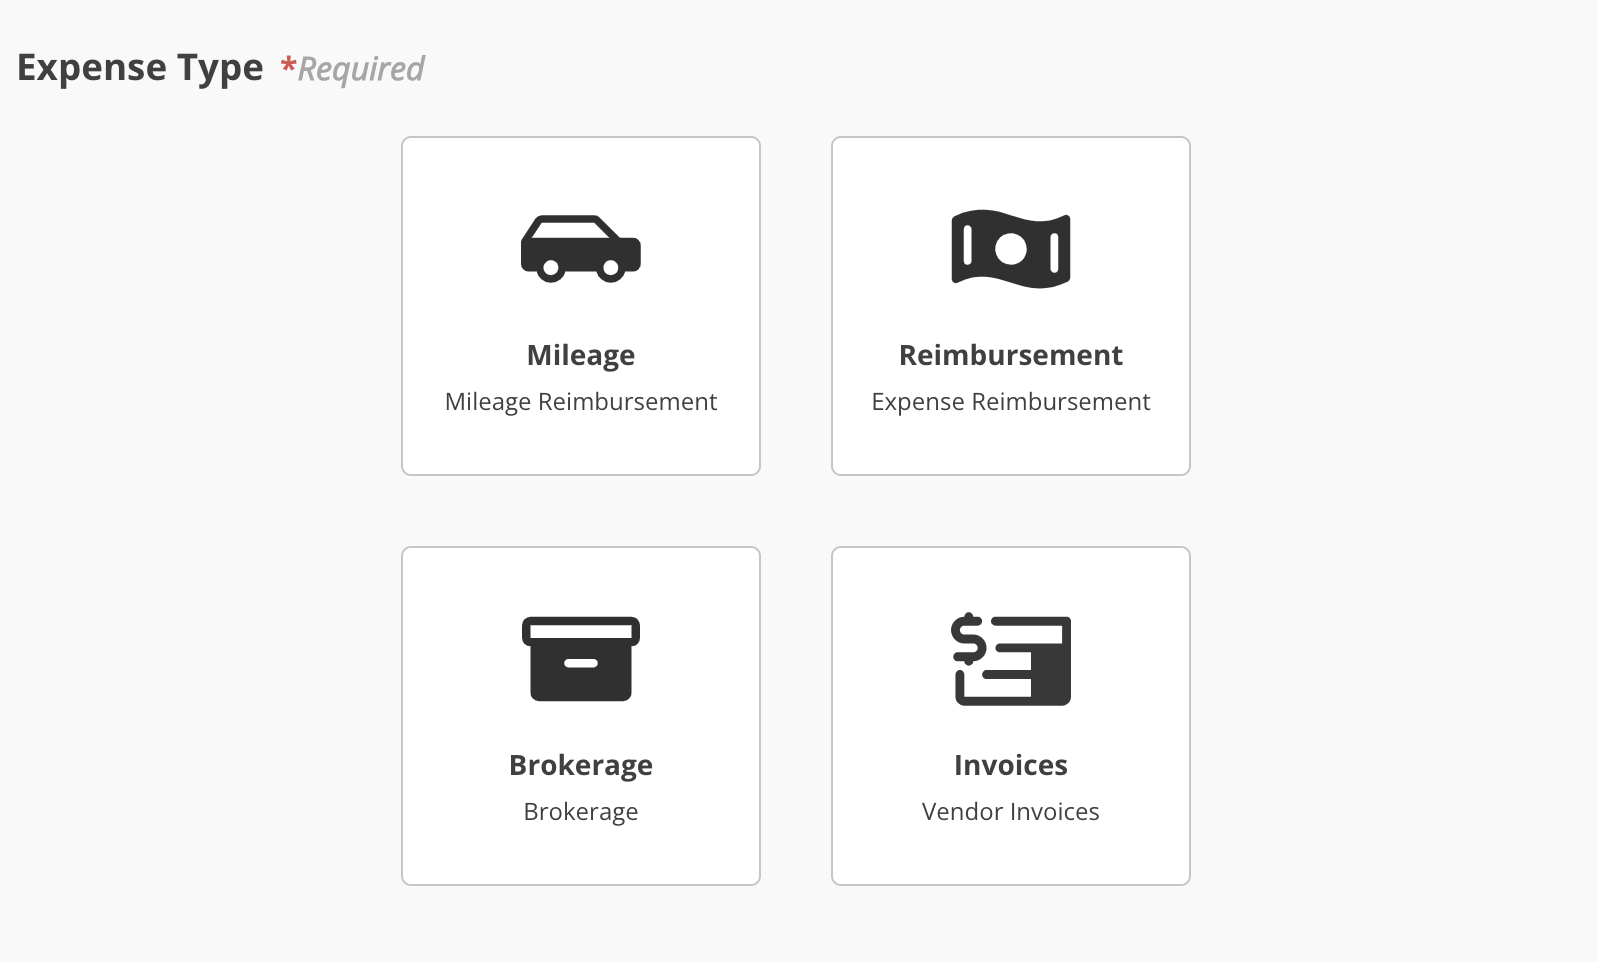
Expense Type Selection
You can now select your expense type from visual tiles instead of a drop-down list. Once an expense type is selected, you will be able to fill out the rest of the form.
Payee Selection
You can now directly select the payee from a drop-down list. If the payee isn't listed, simply select "Other" and type the name.
The payee's electronic payment (ePay) status will be indicated below their name.
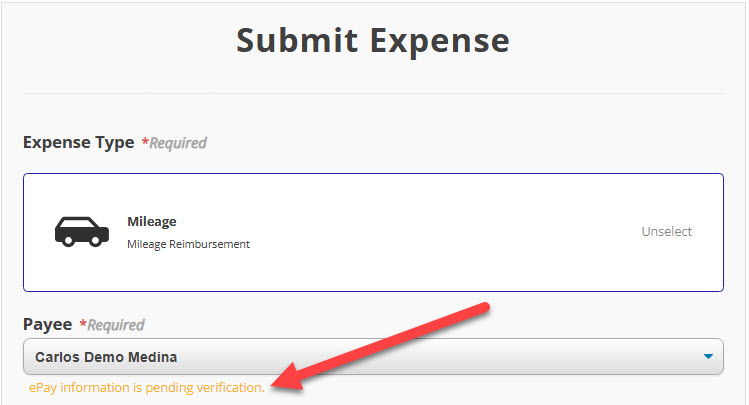
In the screenshot above, our demo user's ePay status is pending, but in the one below, the payee is not enrolled in ePay at all.

ePay status will not impact your ability to submit an expense. The status is included for your information.
Increased Upload Limits
The form now supports larger file uploads. It may take a little more time to process, but this allows for smoother submissions.

Updated 03/21/25.
Expense Submission Form Changes Effective 09/12/24
ISS has made improvements to the Expense Submission Form on our Portal.
The revised Expense Submission Form is more mobile friendly and mobile aware which means that it will look better on both a desktop, laptop, phone, and tablet. It will also work better with your phone or tablet's camera app.
Name and Email
The form will no longer show your name and email address. We know who you are because you logged into our Portal, therefore we don't need to show it. It just takes up space on the form. This information is still being gathered and sent along with your submission.
Phone
We have removed this field from the form. It was optional and the majority of our users never filled it out. We know how to get in touch with you if we need you.
Expense Type
This is a required field. It is unchanged. We still need you to tell us what type of expense you are submitting: Mileage, Reimbursement, Brokerage, or Vendor Invoice.
Earliest Date on Expense
This is a new required field. We need you to enter the earliest/oldest date of service on your expense submission. It needs to be entered in this format: mm/dd/yyyy. There is a calendar pop-up to help you.
This is step one of us working to incorporate this into our processes so that we can find expenses with dates of service that may be at risk of billing deadlines.
Supporting Documents
This is a required field.
We have updated the upload functionality to accept images using your mobile device's camera. By doing this, we are able to tell your device's camera what file type and resolution to provide. This means that a photo taken while uploading an expense will not go over our individual file size limitations.
You can now click Add Files multiple times and when you return to the form the files you previously added for submission will still be there. This includes when you click Add Files and take a picture on your mobile device with your camera app. You can take a picture, add the file, take another picture and add it, and both pictures will be there when you go back to the form.
We will notify you on every file you upload if the individual file is too large, is not an accepted file type, or goes over the max overall submission size.
You can easily click to remove an individual file or all files.
- Allowed file types: gif, heic, jpg, jpeg, pdf, png
- Each individual file cannot exceed: 10 MB
- Each submission cannot exceed: 20 MB
How to Add Files
After you click Add Files on the form, a box will pop-up.
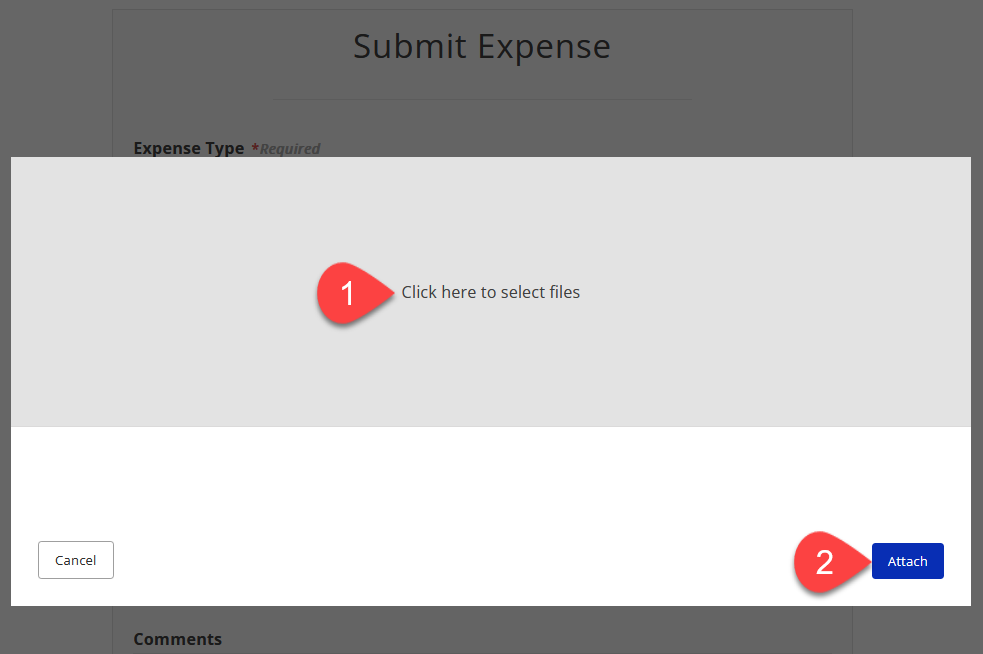
- Click on the gray box that says Click here to select files. Select files by taking a picture with your device's camera app or choosing files already on your device. You can also drag and drop files directly onto the gray box without having to click it first.
- Click on the blue Attach button. This will add the files you just selected and return you to the Expense Submission Form.
Files will not be submitted to ISS until you return to the Expense Submission Form, finish completing all required fields on the form, and click the blue Submit button at the bottom of the Expense Submission Form.
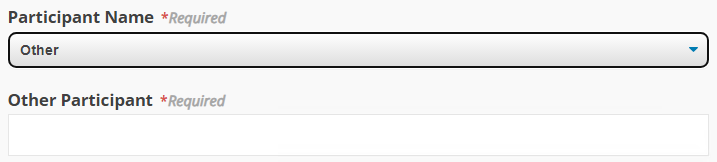
Participant Name
This is a required field. We need you to tell us which Participant the expense is for. Please choose the Participant from the drop down list.
If you need to submit an expense or invoice for a Participant that is not in your drop down list, please select Other. A new field will be exposed called Other Participant. This new field is required once Other is chosen from the drop down list. Please type in the name of the Participant you are submitting an expense for. It is important that you enter the full name of the Participant correctly. Incorrect information entered in this field may result in a delay in processing or rejection of your submission.
The Other option should be used, for example, when a user provides invoiced services such as classes to a Participant they are not otherwise connected to via plan roles such as circle of support, support broker, etc.
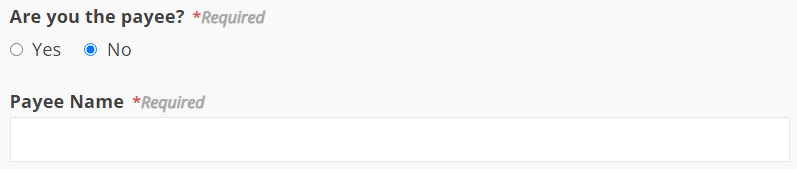
Are you the payee? / Payee Name
This is a required field. It is unchanged. If you are the payee, choose Yes. If you are not, choose No and a new field will be exposed called Payee Name for you to type in who the payee is. For example, if ISS needs to pay your Organization instead of you as an individual, this is where you would enter the name of that Organization.
Comments
This is not a required field. It is unchanged. This is where you would add an optional comment if you needed to.
Note: Unlike Timesheet Uploads, Expense Uploads are not viewable on the Portal until processing is finished.
Updated 10/3/24.
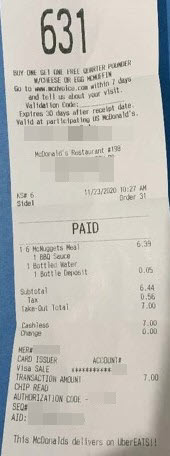
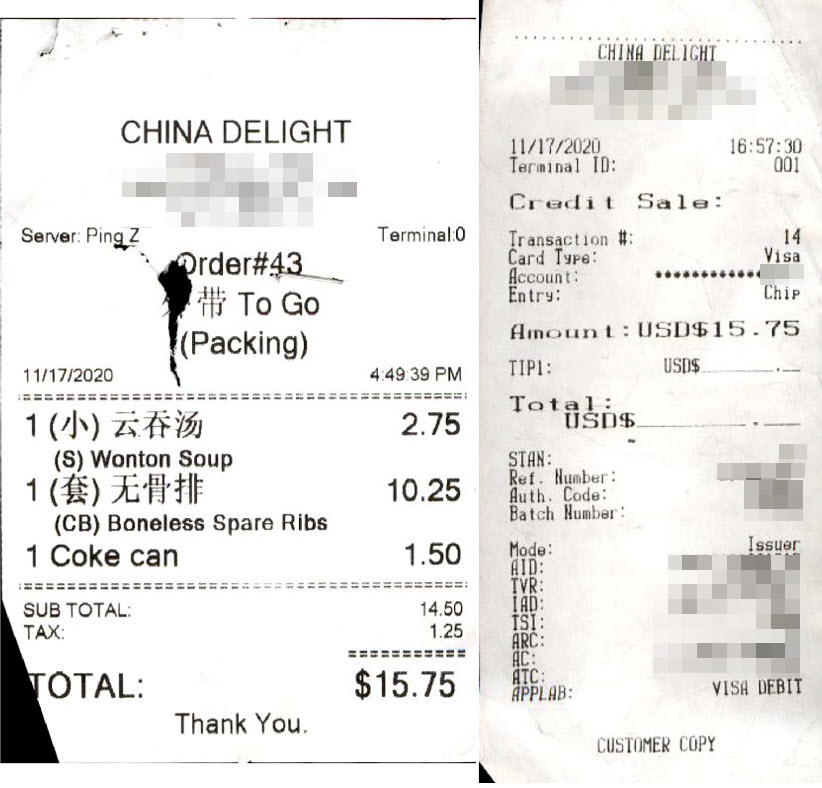
Staff Activity Fee Itemized Receipts and Proof of Payment
In order to be reimbursed for Staff Activity Fees (SAF), an itemized receipt showing the date, amount, what was purchased, and proof of payment is required. This can be one or more documents.
Example of a meal receipt that is both an itemized receipt and proof of payment.
Example of an itemized meal receipt on the left and proof of payment on the right.
Example of proof of payment on the left and an itemized activity receipt on the right.

Example of proof of payment on the left and an itemized meal receipt on the right with the staff's portion indicated.

Created 01/07/25.