Support Staff Resources
Information specific to Support Staff.
- Emergency Room (ER) and Hospitalization Procedure for Support Staff
- Group Jobs for Support Staff
- Group Jobs Intro Video for Support Staff
- Recording time for a group shift
- Correcting a returned group shift
- Requesting Time Off on a group shift
- During a group shift one or more participants has to leave, what do I do?
- One or more participants in the group shift is absent, how do I proceed?
- Participants in a group shift live in close proximity, which location do I select?
- Introduction to Quality Assurance/Corporate Compliance (QA/CC) for New Staff
- Job Seekers (for New Applicants and Current Support Staff)
- SEMP Survey
- Support Staff Dashboard Guide
- UKG (Formerly UltiPro)
Emergency Room (ER) and Hospitalization Procedure for Support Staff
*NOTE: In the event that an ISSNY participant is transported via ambulance, ISSNY staff is required to follow the participant to the hospital in order to provide support. ISSNY staff is also required to report any hospitalization to the participant’s Circle of Support (COS) immediately. ISSNY staff is encouraged to refer to the participant’s Staff Action Plan (SAP) safeguards to learn their required level of oversight.
Step 1: Emergency Room (ER) Triage
The participant will be prioritized according to the severity of their illness or injury. When you arrive at the ER, you can support the participant with checking-in and answering some basic questions, if needed. The participant will then be classified into one of the three categories:
- Emergent: An injury or illness requiring immediate attention to avoid risk of life or limb
- Urgent: An injury or illness requiring attention within four hours
- Non-Urgent: An injury or illness that has an undetermined time frame for treatment
When the triage nurse examines the participant, he or she may initiate treatment based upon established medical protocols related to the illness or injury, such as x-rays, collecting blood or urine samples, and applying ice packs or wound dressings.
*NOTE: ISSNY staff is permitted to work with the participant during the ER triage process
Step 2: Medical Examination
Once the participant has been placed in an examination room, a nurse, physician, or physician's assistant will be assigned to care for them. Additional diagnostic lab work or testing may also be performed during this time.
*NOTE: ISSNY staff is permitted to work with the participant during medical examinations in the ER
Step 3: Disposition
Once testing is complete, a decision will be made to either admit the participant to the hospital or to discharge (skip to Step 5).
*NOTE: ISSNY staff is permitted to work with the participant during disposition in the ER
Step 4: Hospital Admission
If the participant is admitted to the hospital, a physician will be contacted to complete the admission process. The physician should provide information about the condition of the participant and location of a nearby waiting area.
*NOTE: ISSNY staff should not be working with the participant once they are admitted to the hospital
*NOTE: All hospital admission dates must be reported to ISSNY via email qualityassurance@issny.org
Step 5: Discharge
When the participant is discharged, instructions for their care (i.e. discharge plan) and follow-up with a physician will be provided.
*NOTE: ISSNY staff can resume working immediately following the participant’s hospital discharge
*NOTE: All hospital discharge dates and plans must be provided to ISSNY via qualityassurance@issny.org
Information adapted from: https://bonsecours.com/richmond/our-services/emergency-services/emergency-room-process
If you have any questions regarding this ER and Hospitalization procedure, please contact the ISSNY QA/CC department, via phone (833-477-7287) or email: qualityassurance@issny.org
Created 04/02/26.
Group Jobs for Support Staff
Group Jobs Intro Video for Support Staff
Created 05/22/24.
Recording time for a group shift
Creating a Group shift
Creating a group shift is very similar to creating a regular shift, but it allows you to have more than one participant on the same shift.
To create a group shift:
- From the home page, click on the Start Group Shift button or in eTime Live, select the icon with two people to start a group shift.
- Select the participants in that shift.
- Only participants that have a group job shared between them can be selected together.
- If only one of the participants in this group is available for this shift, do not select a group shift. Instead, start an individual shift with that participant.
- Once a participant is selected, participants who do not have a group job with the selected participants will not be selectable.
- Select the group job from the list.
- The group jobs listed on this screen are the only jobs available for the combination of selected participants.
- If the selected job and method require EVV, select a start location for each participant.
- If a shift takes place at a participant's home, select home for that participant and community for everyone else.
- If the home that's being used for a group shift is shared by any participants, select home for these participants.
- If the shift is not taking place at any of the participant's home, you can select community for all of them.
- If any participant has more than one service address where home was selected, the staff should specify which service address.
- Review the selections made and click Add to start the shift.
Events in a Group Shift
Meetings and trainings are OK.
Participant absent should not occur.
Editing a Group Shift
Ending a Group Shift
If during a shift there is a change in the number of participants, you should end the current shift and start a new one.
- From the homepage, use the green "End Shift" button, or when viewing the shift in eTime Live, click the End Shift button.
- Verify that all shift details are added properly.
- If the selected job and method are EVV Required, select the end location for each participant.
- Review the information.
- Click Submit.
Submitting a Group Shift
A group shift is submitted for approval just like any other shift.
Once a shift is submitted, it will be held for review and it has to be approved by each participant's approver.
Updated 05/10/24.
Correcting a returned group shift
From My Work, select the returned shift. You will see the following details about the returned shift.
- A dropdown at the top of the page which you can use to navigate between participants to view their individual shift details.
- A red box indicating who returned the shift, the reason, and description why the shift was returned.
To fix a returned shift, in My Work, select the shift marked as returned and:
- Use the dropdown to review individual participant shift details.
- Use the edit in eTime link below the red box or the Submit in eTime button at the bottom of the shift details card to correct the shift in eTime.
- Review the reason and description for the shift being returned and make any necessary changes.
- Click Submit to resubmit the shift for approval.
Updated 05/10/24.
Requesting Time Off on a group shift
The "Add Time Off" process has been enhanced to accommodate requesting Paid Time Off (PTO) for group jobs.
When adding a time off request, if you have any group job(s), you will be asked if you are asking this time off from a single or group job.
When "Group Job" is selected, you will be asked to select which job you are asking PTO for. Jobs are listed by name as well as the names of participants who are part of that group job.
The rest of the process has not been modified. See Requesting/Submitting Time Off for more information.
Updated 05/10/24.
During a group shift one or more participants has to leave, what do I do?
During a group shift one or more participants has to leave, what do I do?
End the current group shift and start a new group shift with the remaining participants. If only one participant remains, end the group shift and start a new single shift.
Updated 05/10/24.
One or more participants in the group shift is absent, how do I proceed?
One or more participants in the group shift is absent, how do I proceed?
If the there are two or more participants available for the group shift, you can proceed with the available participants. When selecting participants for the shift, do not select absent participants.
If only one participant is available, you should not use the group shift feature. Instead, begin a single shift.
Updated 05/10/24.
Participants in a group shift live in close proximity, which location do I select?
Participants in a group shift live in close proximity (for example in the same apartment complex) and they are doing an activity together in a communal area, which location do I select?
If the communal area is within the geofence for all of the participants in the group shift, you can either select home, or community for both participants.
Note: If the shift is taking place at the home of one of the participants, please select home for the participant whose home is being used, and select community for the other participant(s) in the group shift.
Updated 05/10/24.
Introduction to Quality Assurance/Corporate Compliance (QA/CC) for New Staff
ISSNY IS COMMITTED TO COMPLIANCE WITH STATE AND FEDERAL RULES, REGULATIONS, AND LEGAL REQUIREMENTS. THESE REQUIREMENTS GOVERN THE DELIVERY OF MEDICAID FUNDED SERVICES.
THE ISSNY QA/CC DEPARTMENT WORKS TO DETECT, PREVENT, AND AVOID FRAUD, WASTE, AND ABUSE.
ALL EMPLOYEES, VOLUNTEERS, AND CONTRACTORS ARE MANDATED REPORTERS.
NOTIFY QA/CC WHEN:
- You know or suspect suspicious behavior or identify a potential incident.
- Including potential Medicaid fraud, waste, or abuse.
- You are concerned for a participant’s health, safety, and/or well-being.
- You know or suspect another party is falsifying documentation, such as:
- You are asked to put inaccurate information on your timesheet (i.e. your timesheet does not reflect the hours you actually worked, you are asked to bill for a service that is not directly related to a valued outcome, etc.)
- You are being persuaded to submit inaccurate reimbursements for mileage, staff activity fees, etc.
- You know or suspect a fellow staff is working with two participants and/or through two different Fiscal Intermediaries at the same time.
- You are asked to forge a participant or representative’s signature.
- You are encouraged not to report incidents or concerning behaviors to ISSNY.
Resources are always available at: http://www.issny.org/compliance/
CONFIDENTIAL HOTLINE:
(833) -477-7287
QA/CC EMAIL:
QUALITYASSURANCE@ISSNY.ORG
Whistleblower Protections Disclaimer
Intimidation or retaliation will not be permitted against persons who report potential issues to the QA/CC Department. Any allegations of intimidation or retaliation will be thoroughly investigated.
Note: Staff are mandated to complete annual ISSNY Trainings via Mind Flash. Human Resources distributes training via email. There is detailed guidance on QA/CC policies, procedures, and reporting processes in the Mind Flash Training Series. Staff are encouraged to contact QA/CC if there are any questions.
![]()
Created 04/09/26.
Job Seekers (for New Applicants and Current Support Staff)
Beginning Monday, April 24, 2023, we will no longer be sending out resume and job posting eblasts through Constant Contact. Instead, resumes will be available through our website at https://www.issny.org/job-seekers/ on a password-protected page.
On the Job Seekers page, you will see two boxes:
Apply Here, and Participants/Circles of Support. Click on the heading of the box you are interested in and you will see specific and relevant information explaining a little about Self-Direction.
Here is a brief explanation of each category:
New Applicant and Current Support Staff - If you wish to explore additional employment as a Self-Hired Support Staff, email your resume to: opportunities@issny.org.
Be sure to include your contact information, available hours and areas you are willing to travel to.
By submitting your resume, you agree to allow Independent Support Services to post it for our Participants and their Circles of Support to review and contact you for an interview, as they are the ones recruiting for staff as part of the Self-Hire process.
All posted resumes will be removed upon hire or removed after 60 days.
Participants/Circles of Support – This is for our Participants and their Circles. This page has links to the password-protected resume page and the hiring form. Once on the resume page, you will see resumes listed by applicant location and includes the date submitted and if the applicant is a current Support Staff. For the password, please reach out to your Self-Direction Coordinator.
Overall, the advantage of this new process is that you can visit our website to view resumes any time without having to subscribe. For applicants, it gives them all the needed information about Self-Direction and the necessary links.
Additionally, for Participants and Circles, if the applicant has never been hired before, having them complete the application and submit their resume is one less step needed to be completed for the hiring process. With this new method, we will no longer be accepting job ads. If you have an opening, please go on the website and view resumes.
Job Seekers
| Apply Here Click here if you would like to submit your resume for ISS participants to view |
Participants / Circles of Support ISS is currently providing you with Fiscal Intermediary Services. |
Updated 10/31/25.
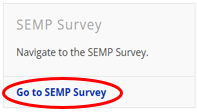
SEMP Survey
Accessing the SEMP Surveys
This guide will help you access the SEMP surveys from your ISS Portal homepage.
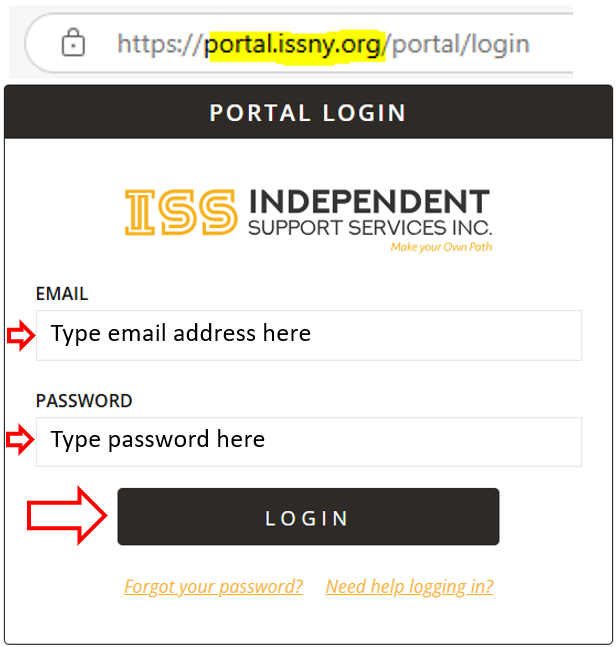
To start, you’ll need to go to the ISS Portal and Login.
Once logged in, find the SEMP Survey Widget and click on "Go to SEMP Survey"
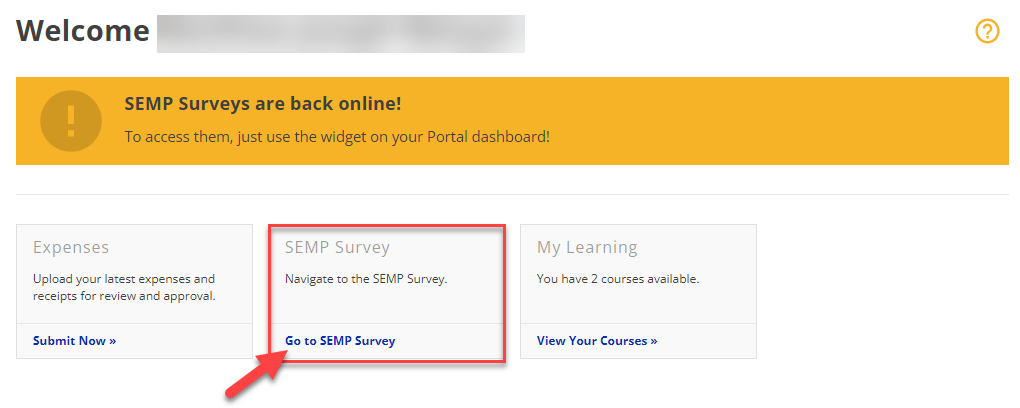
You will have the SEMP Survey widget on your homepage if you are actively assigned as a SEMP Reporter. If you do not see it, please reach out to the Self-Direction Coordinator (SDC) assigned to your case for further assistance.
A new window will open with the SEMP Survey homepage. From here, you can access the surveys.
Updated 04/18/25.
SEMP Survey User Guide
This guide reflects the SEMP Survey Updates from January/February 2025.
Walk-Through
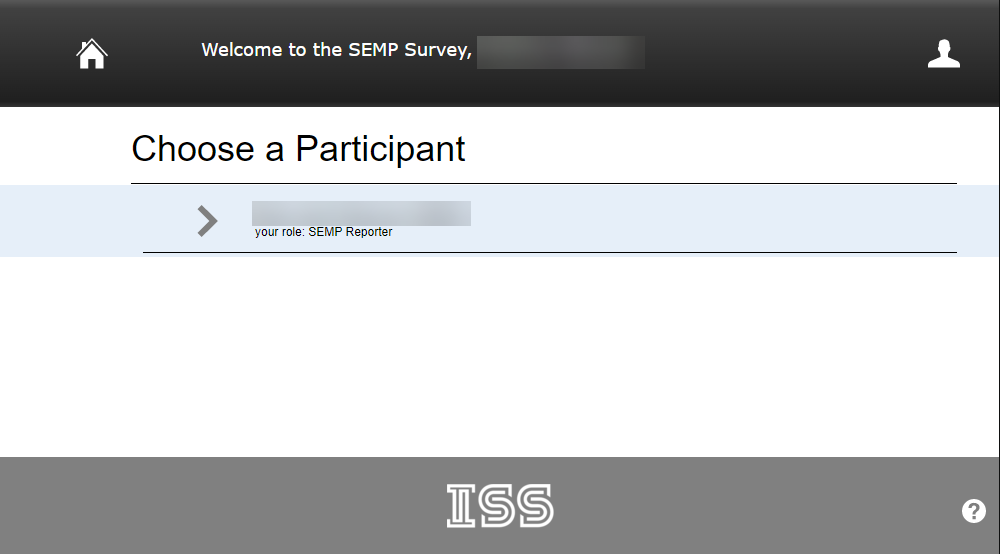
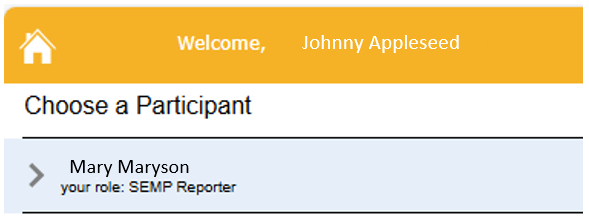
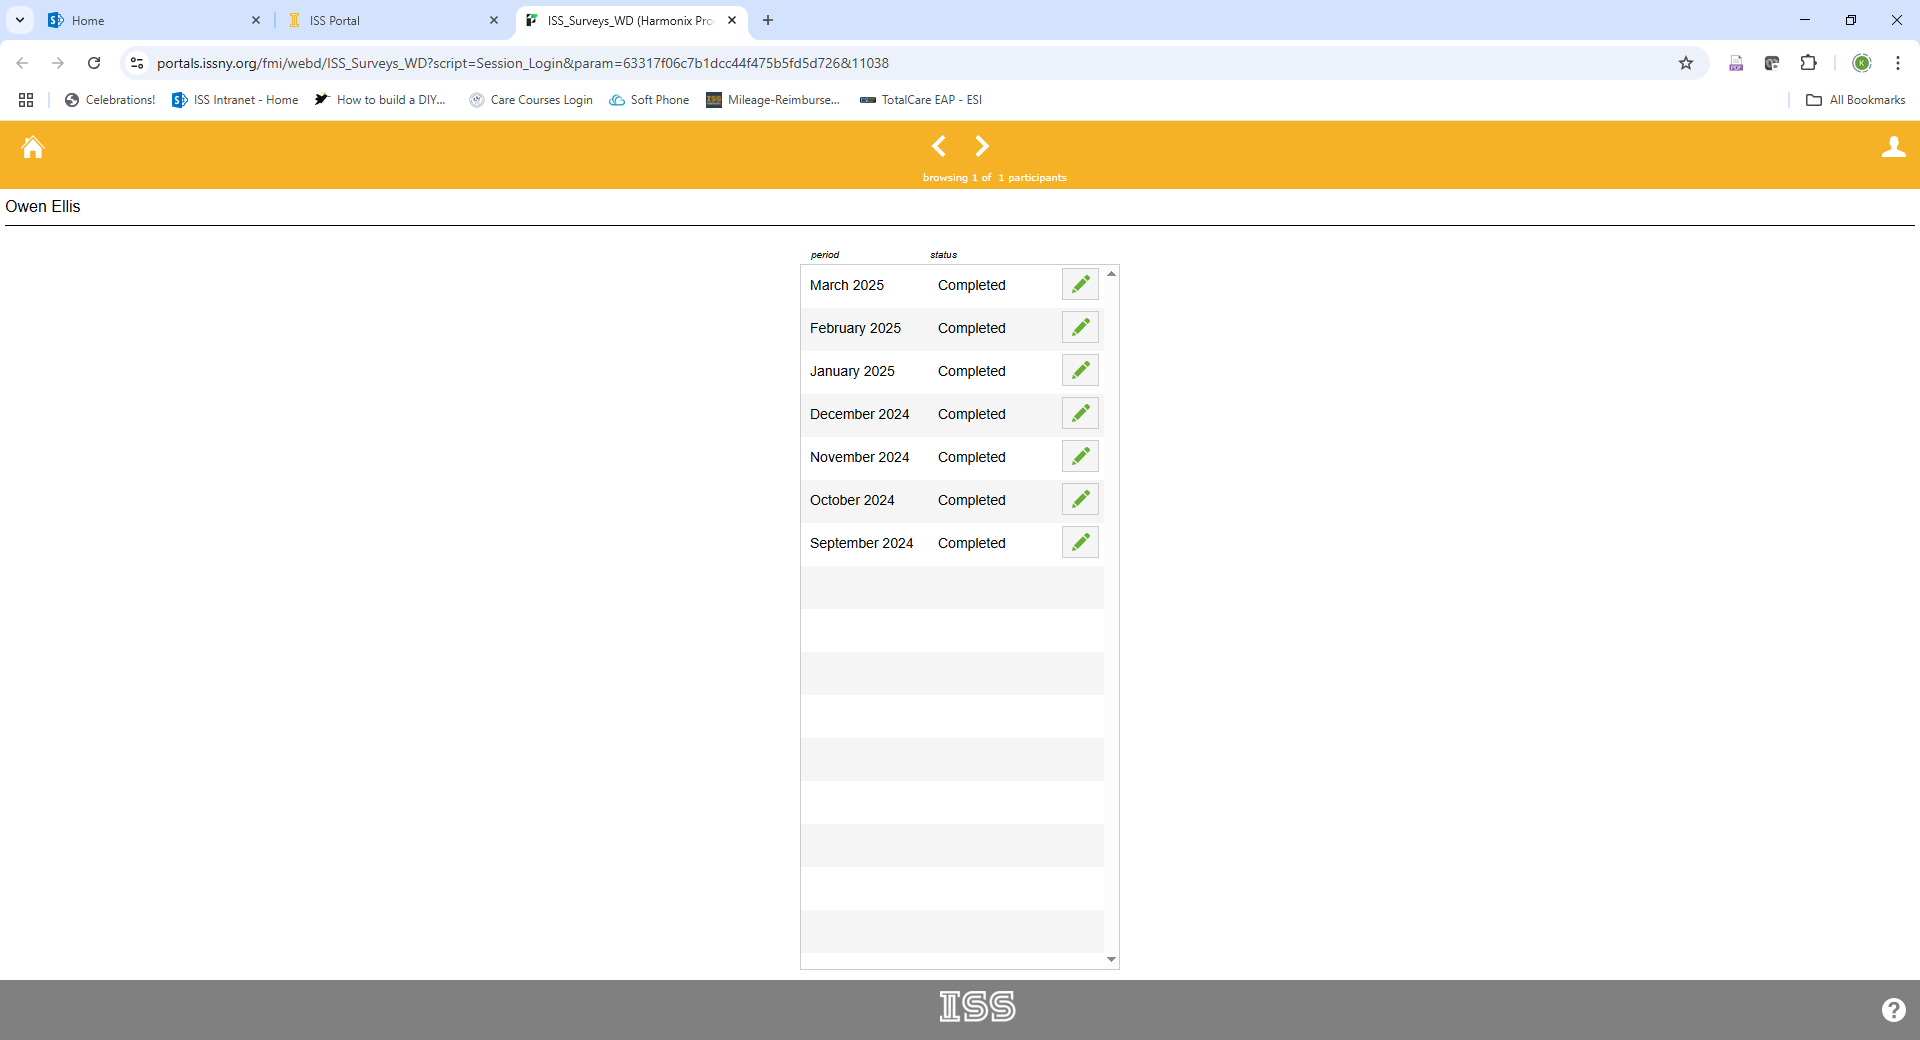
Log into the ISS Portal.
Click on “Go to SEMP Survey.”
Click on the participant who you are completing SEMP surveys for.
This brings up a list of completed (green) and uncompleted SEMP surveys (red). As of February 25, 2025, old surveys that have already been completed have also been confirmed and they can be viewed but not edited. You can only work on incomplete surveys. If information is not accurate on older surveys, please move forward entering correct information and disregard previous surveys.
Click on the first survey showing “Incomplete.”
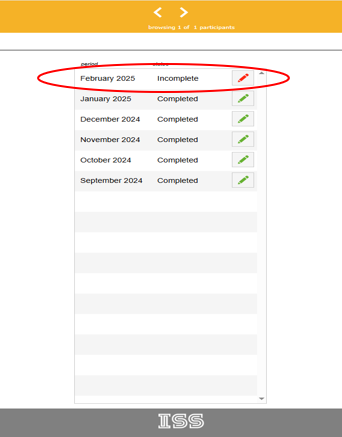
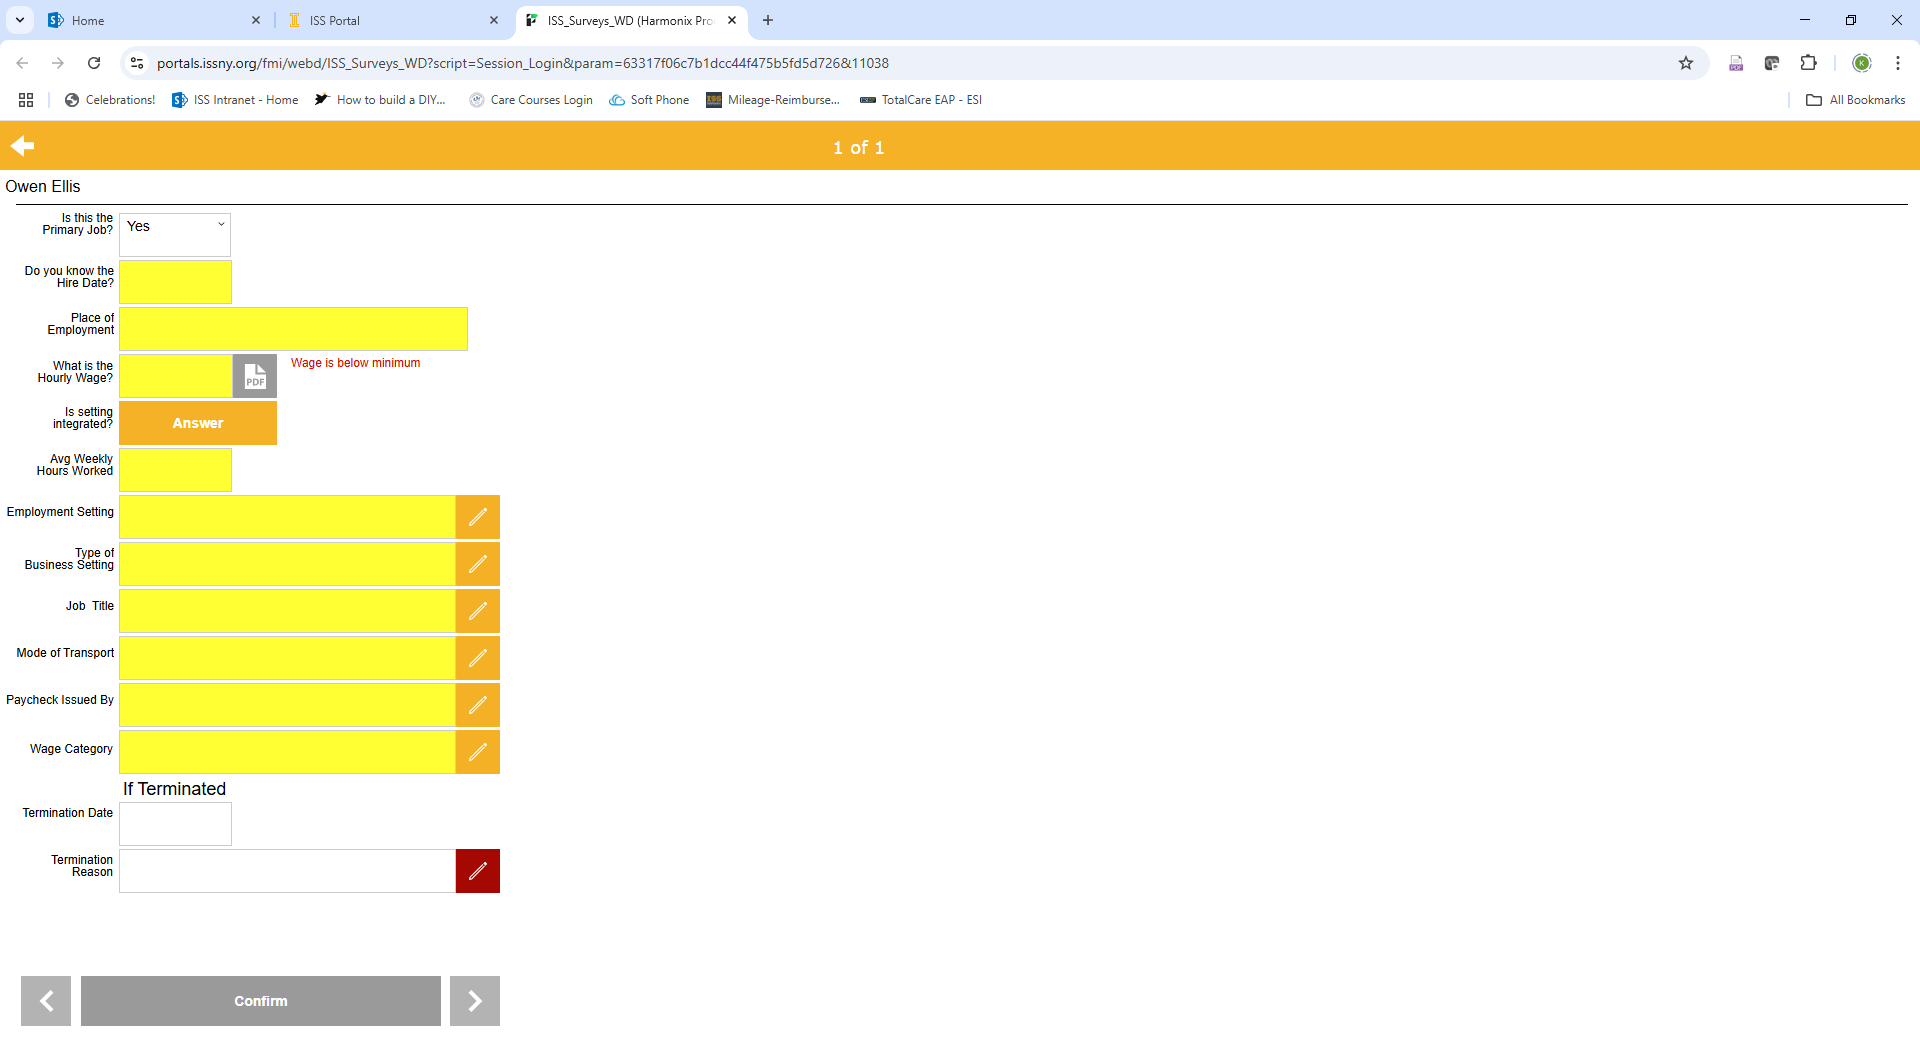
Certain colors mean certain statuses. The goal is for everything to be turned to green in order for you to mark the survey complete.
- Yellow means a field is required to be completed.
- Orange means there are actions the SEMP reporter has to take and information is incomplete.
- Green means everything is good to go, completed and confirmed and there is nothing left to do.
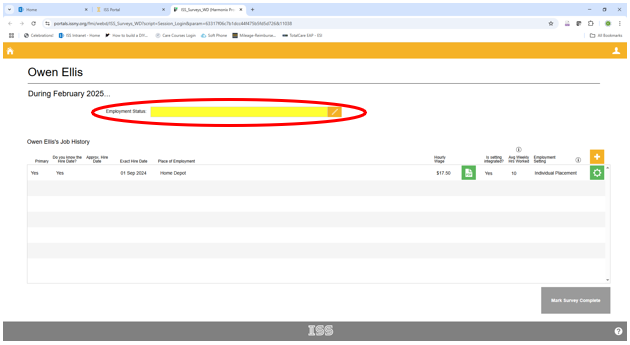
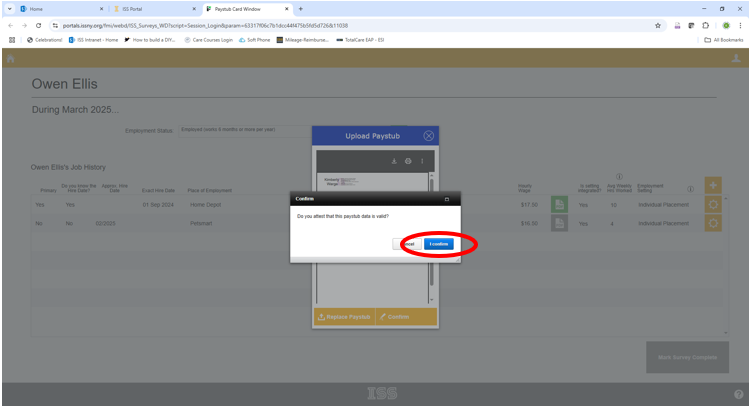
The first required field is “Employment Status” – Select the appropriate employment status.
If someone has SH SEMP in their budget, but is currently not using it – please select “Not Serving Temporarily”
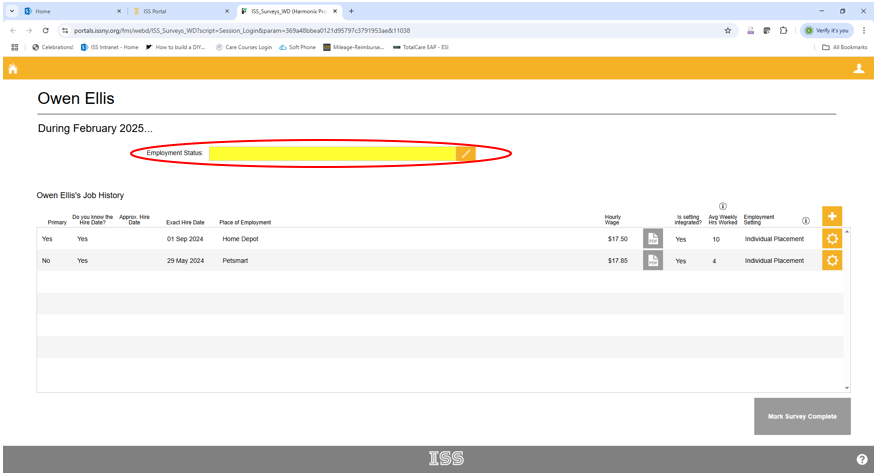
Once the “Employment Status” is selected, the button will appear green.

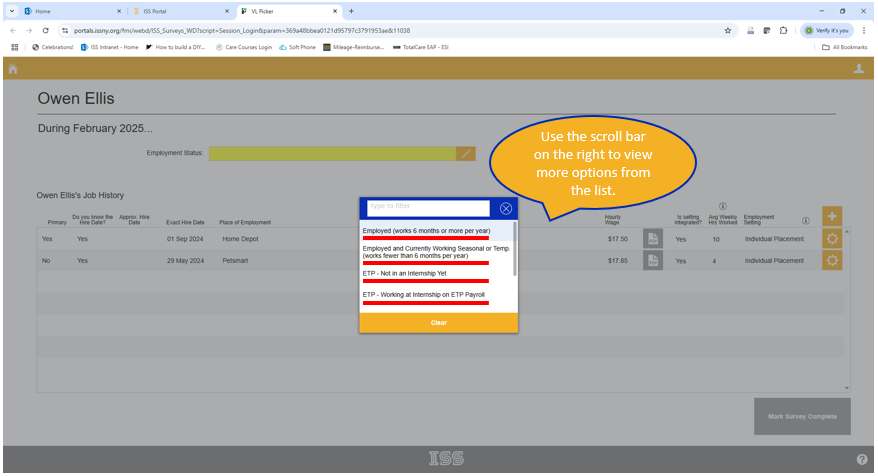
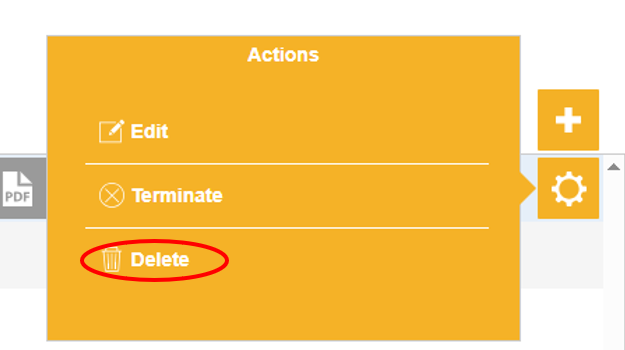
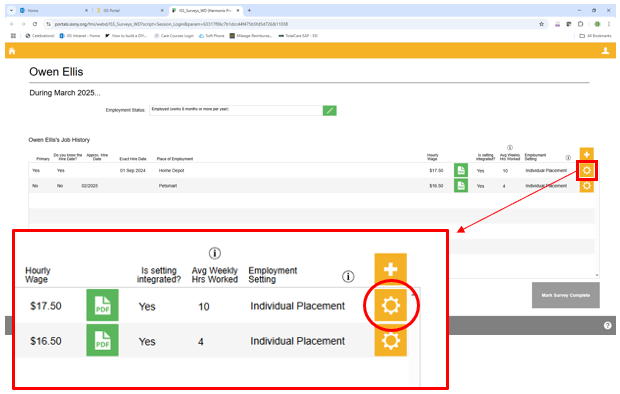
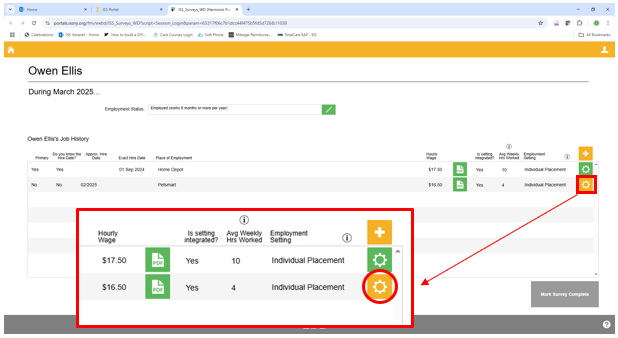
Job information cannot be edited on the first screen. In order to edit the information, click on the gear shape to the right of “Job History” and click “edit”

If you have too many job entries listed, you can also hit this button and press “delete” to ensure only the correct job listings are showing
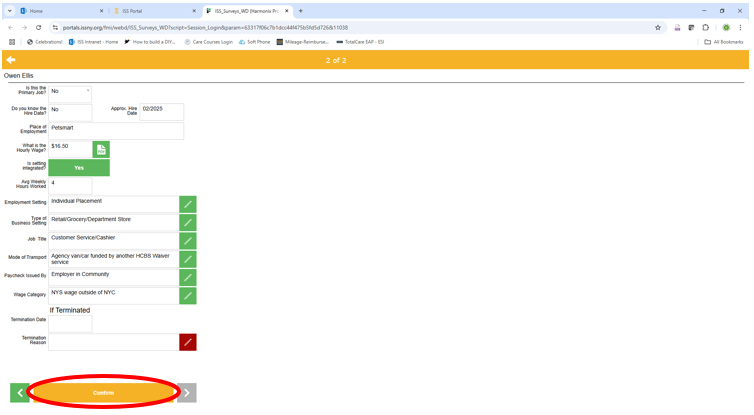
Follow the prompts and enter the correct information. Please try to enter accurate information. If you do not know the answer, please consult with the participant and planning team. Please find the questions below:
- Is this the primary job?
- Do you know the hire date?
- Place of Employment?
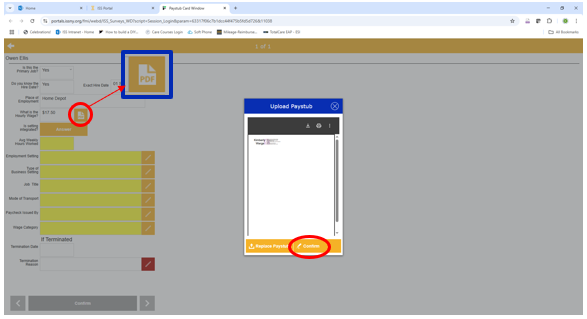
- What is the hourly wage? Upload a PDF
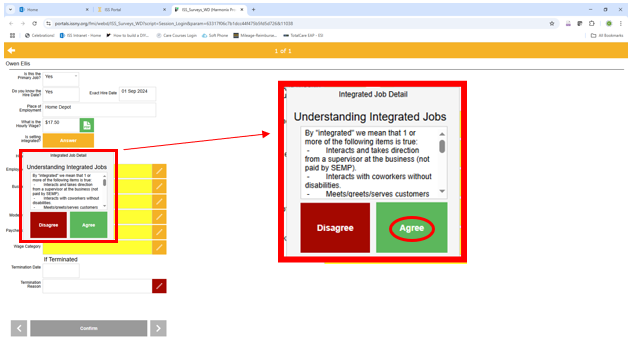
- Is the setting integrated?
- Avg Weekly Hours Worked?
- Employment Setting?
- Type of Business Setting?
- Job Title?
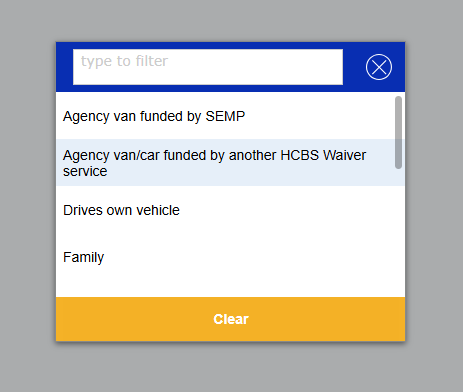
- Mode of Transport?
- Paycheck Issued By?
- Wage Category?
Helpful Hints!
Primary Job?
If there are multiple jobs listed, you will have to choose which one is the primary job. Once you click Yes, a screen will pop up allowing you to click on the “primary job.”
What is the hourly wage?
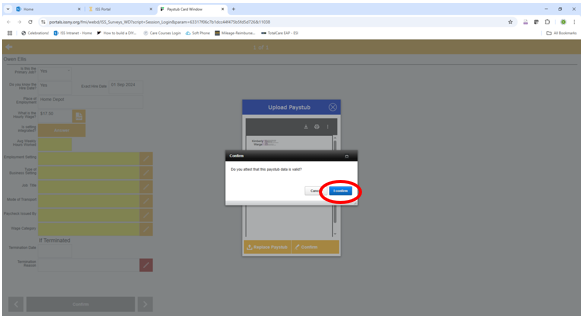
FYI: You will need to upload a current pay stub for the month’s survey that you are completing. PDFs are best! You will also have to upload a 2025 pay stub to the corresponding survey month in order to be able to “confirm the data is valid” and move forward to “Mark the Survey Complete.” A participant should be earning at least minimum wage.

Every month you will have to “confirm” the rate of the pay stub is still accurate. If it is NOT, please “replace the pay stub” with an accurate updated one.
- https://www.ny.gov/new-york-states-minimum-wage/new-york-states-minimum-wage
- https://www.dol.gov/agencies/whd/minimum-wage
If a person has a “federal job” and works for town/government position – they can be earning FEDERAL minimum mage which is significantly less than NYS’s minimum wage. The current federal minimum wage is $7.25 per hour and was established under the Fair Labor Standards Act dating back to 07/24/2009.

Mode of Transport?
If Self Hired Staff are transporting the participant to/from their job and working with them there, please select “Agency van/car funded by another HCBS Waiver Service” – this would be considered IDGS – Service Related Transportation.
Wage Category?
Select the appropriate wage category depending what state or what part of the state the person works in.
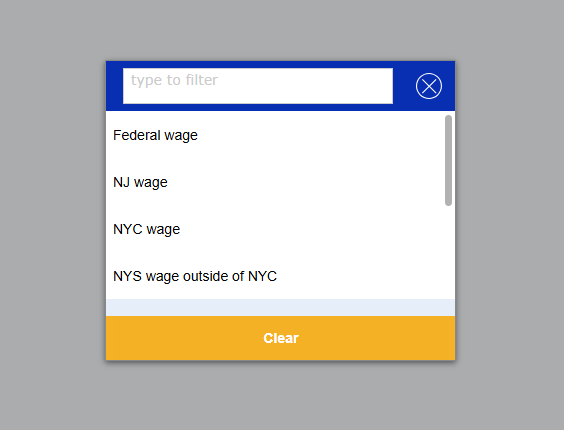
If someone lives in NYS (outside of NYC) and is earning at least minimum wage for the region, please select “NYS wage outside of NYC” for wage category
Please only select “federal wage” if a person is working a federal position for a local town, government, etc. earning at least $7.25.
Please be mindful that ISS did not select these questions or choice selections. The prompts/choices are coming directly from a SEMP report requested by OPWDD for all SEMP provider agencies. The choice options do not always coincide with Self Hired Supported Employment and is more tailored to traditional agencies that utilize traditional agency based supported employment. Please do your best!

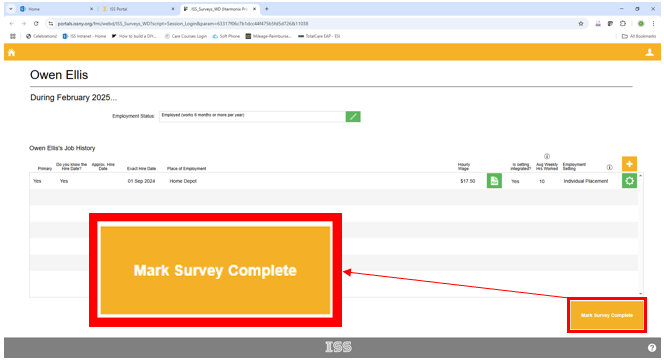

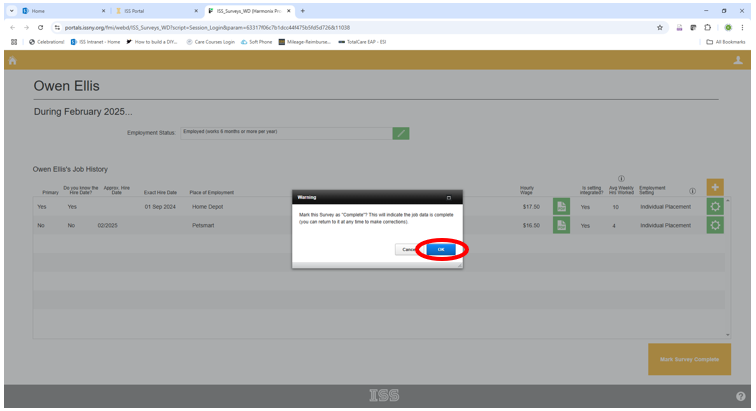
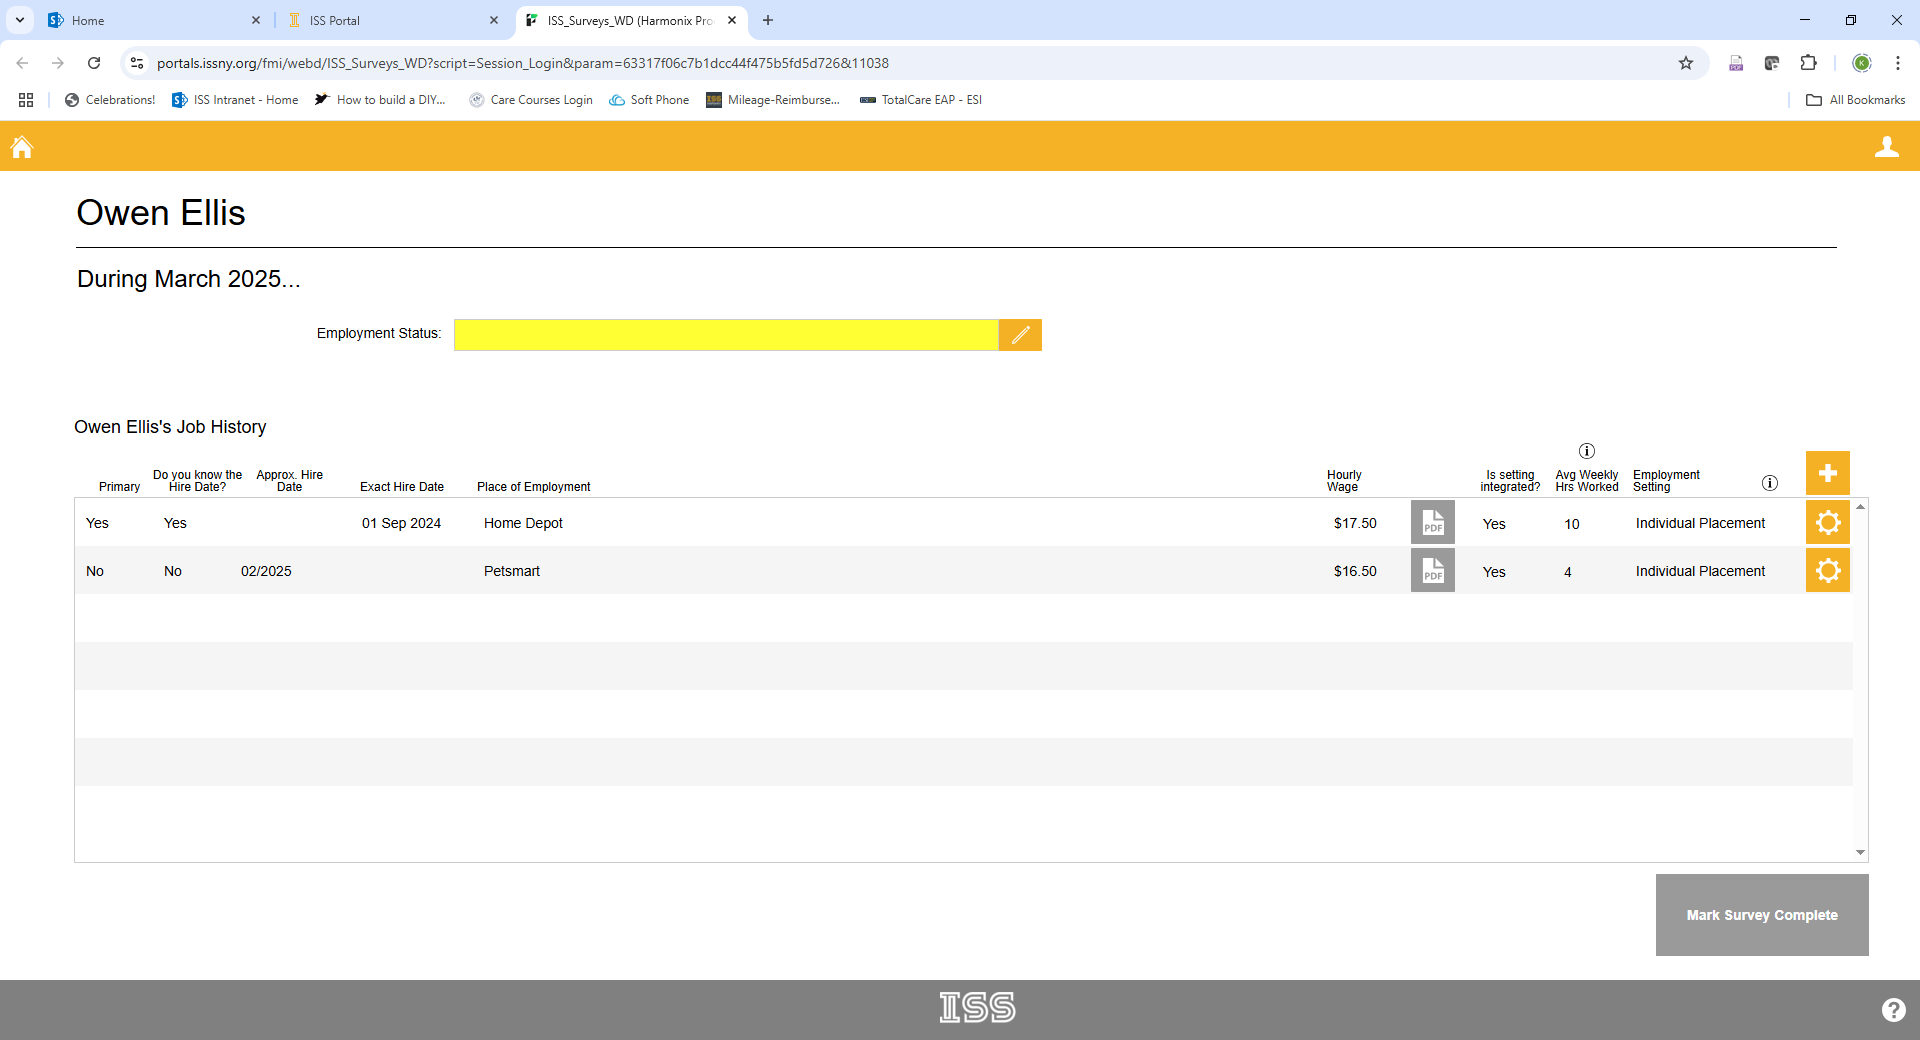
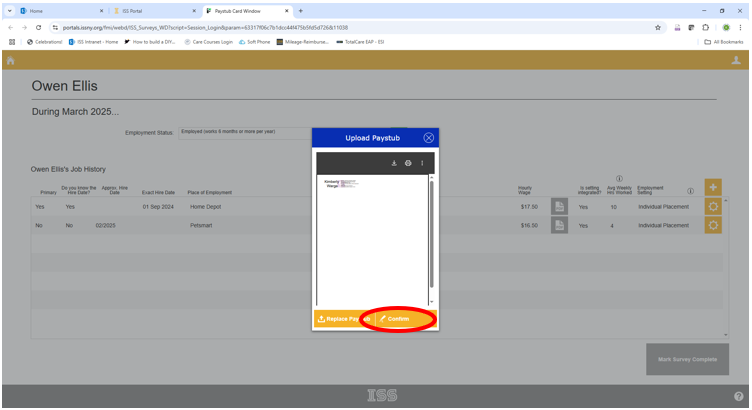

You are going to complete all required fields and tasks turning everything green. From there click “confirm” and a confirmation window will pop up asking you to click “I confirm.” Once you confirm all the information is correct – it will show green and allow you to “Mark the Survey Complete.” If you are unable to mark the survey complete, it is because you have left a task incomplete. See screenshots below for more information.

Created 04/18/25.
SEMP Survey Video Tutorial
Created 04/18/25.
Support Staff Dashboard Guide
View Employer Details
To view details for an employer:
(1) Click My Employers from the navigation menu.
(2) Select an employer.
Note: An employer displays under the Inactive Employers section when no active jobs exist with you and that employer.

Summary Information
This section contains basic status and contact information for the employer.
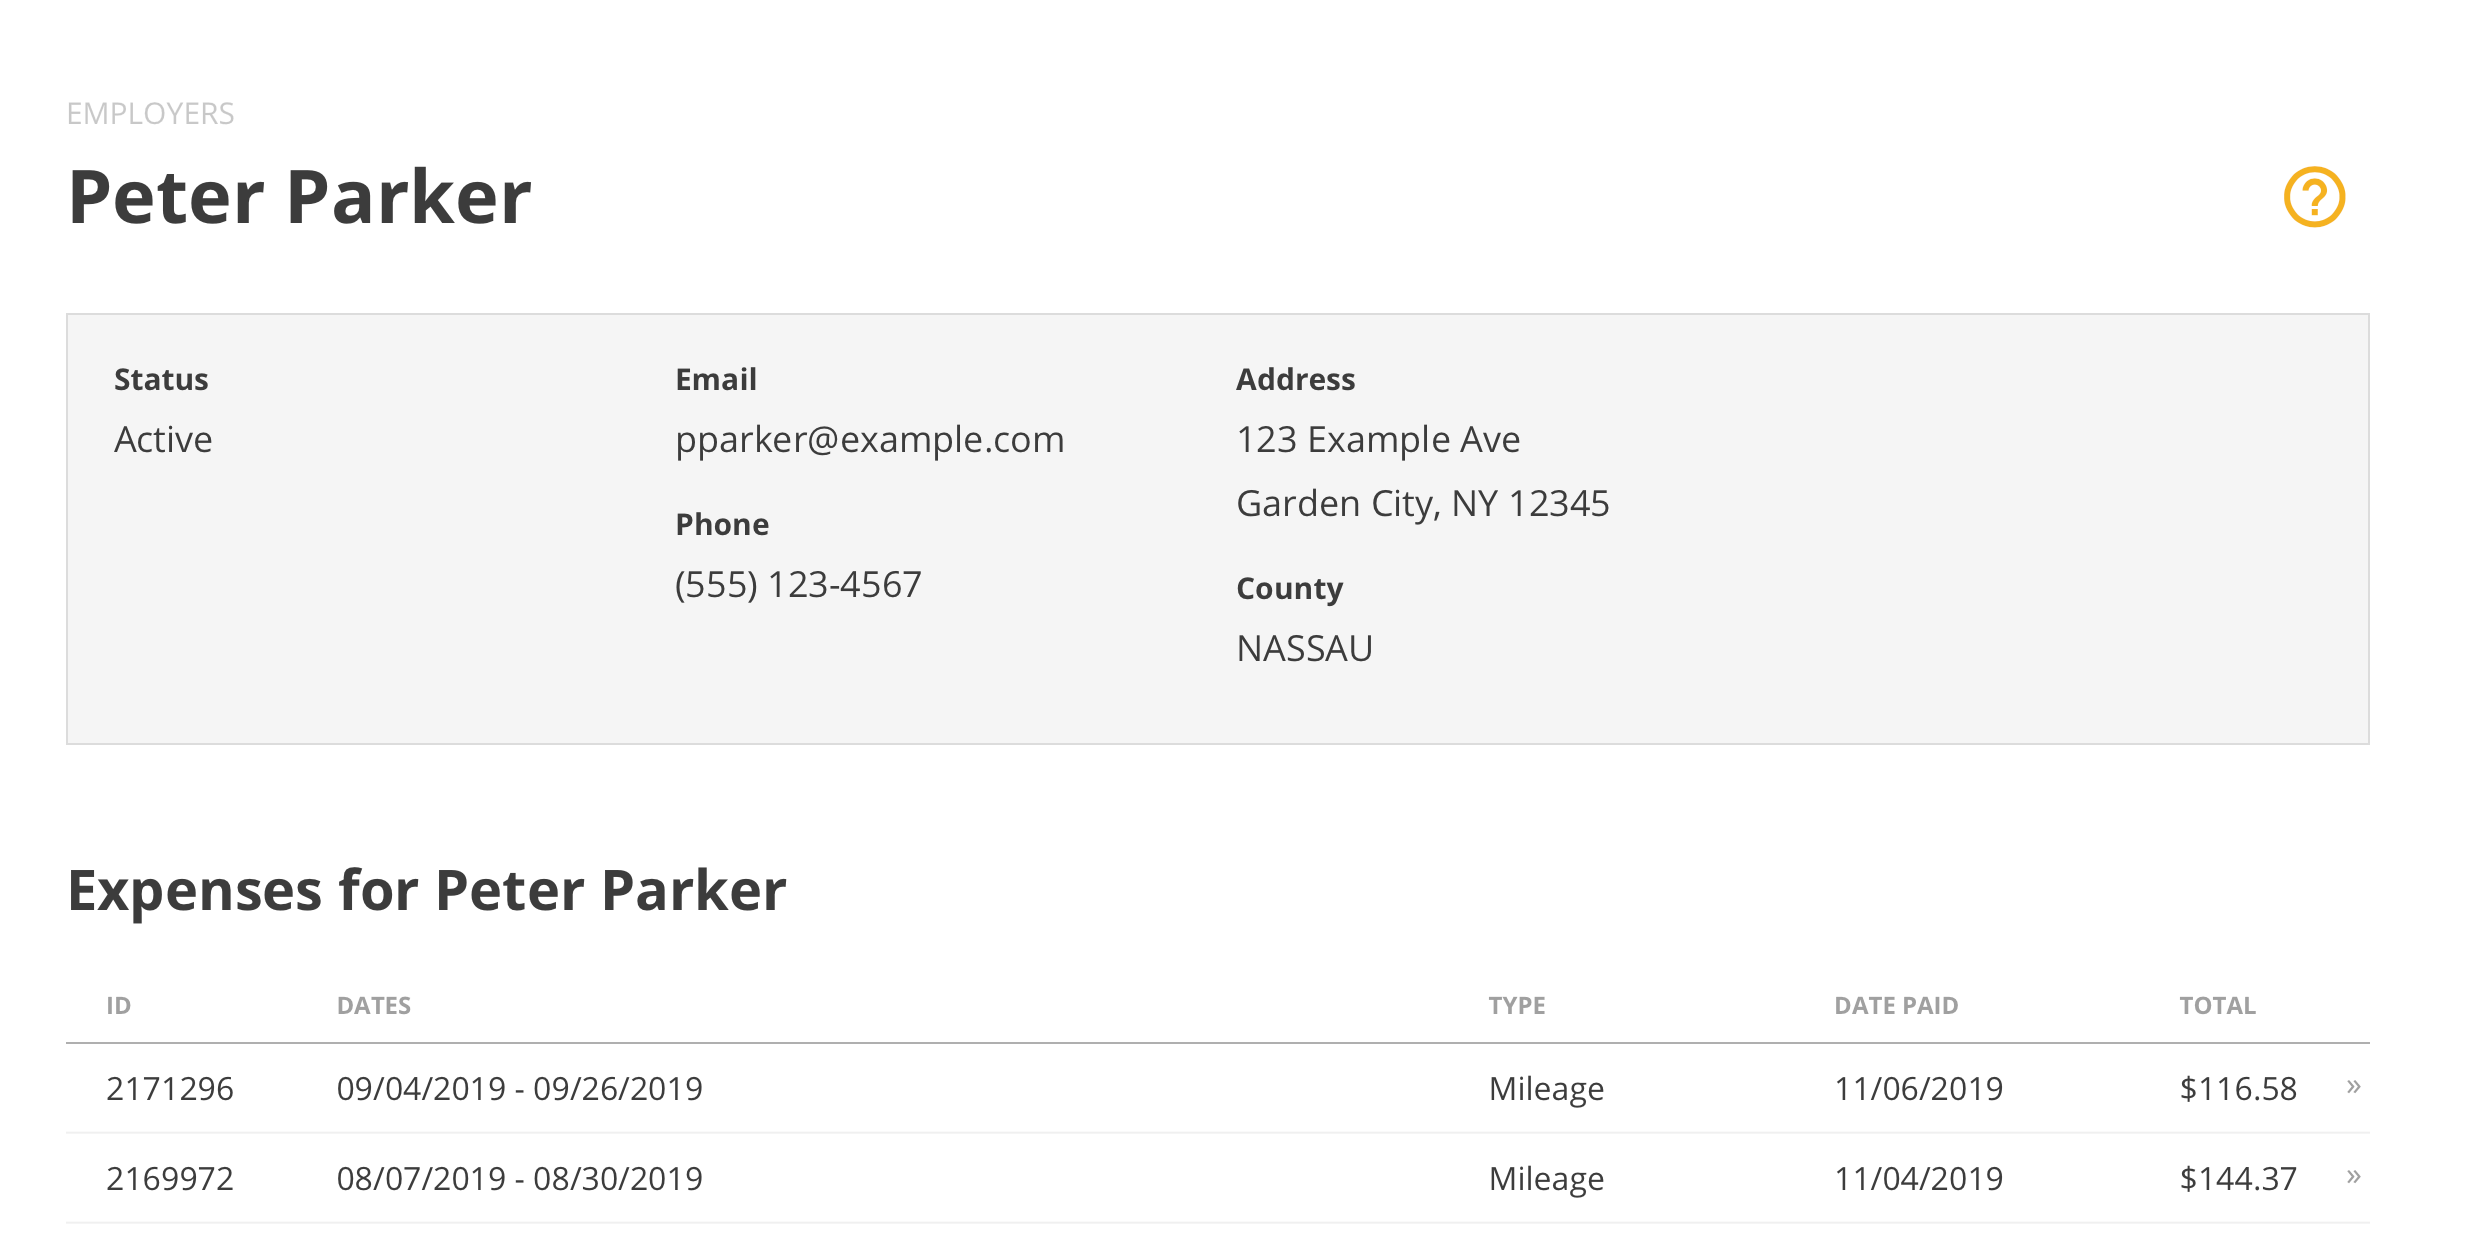
Expenses
This section shows a list of your most recent expenses for the employer. • Select an expense to view its details.
• Click View All » to view all of your expenses for the employer.
• If you do not have any expenses for this employer, the Expenses section will not display

Job Roles
The Job Roles section shows your active and recently inactive job roles for the employer. • Select the tab for a job role to view its information and related timesheets.
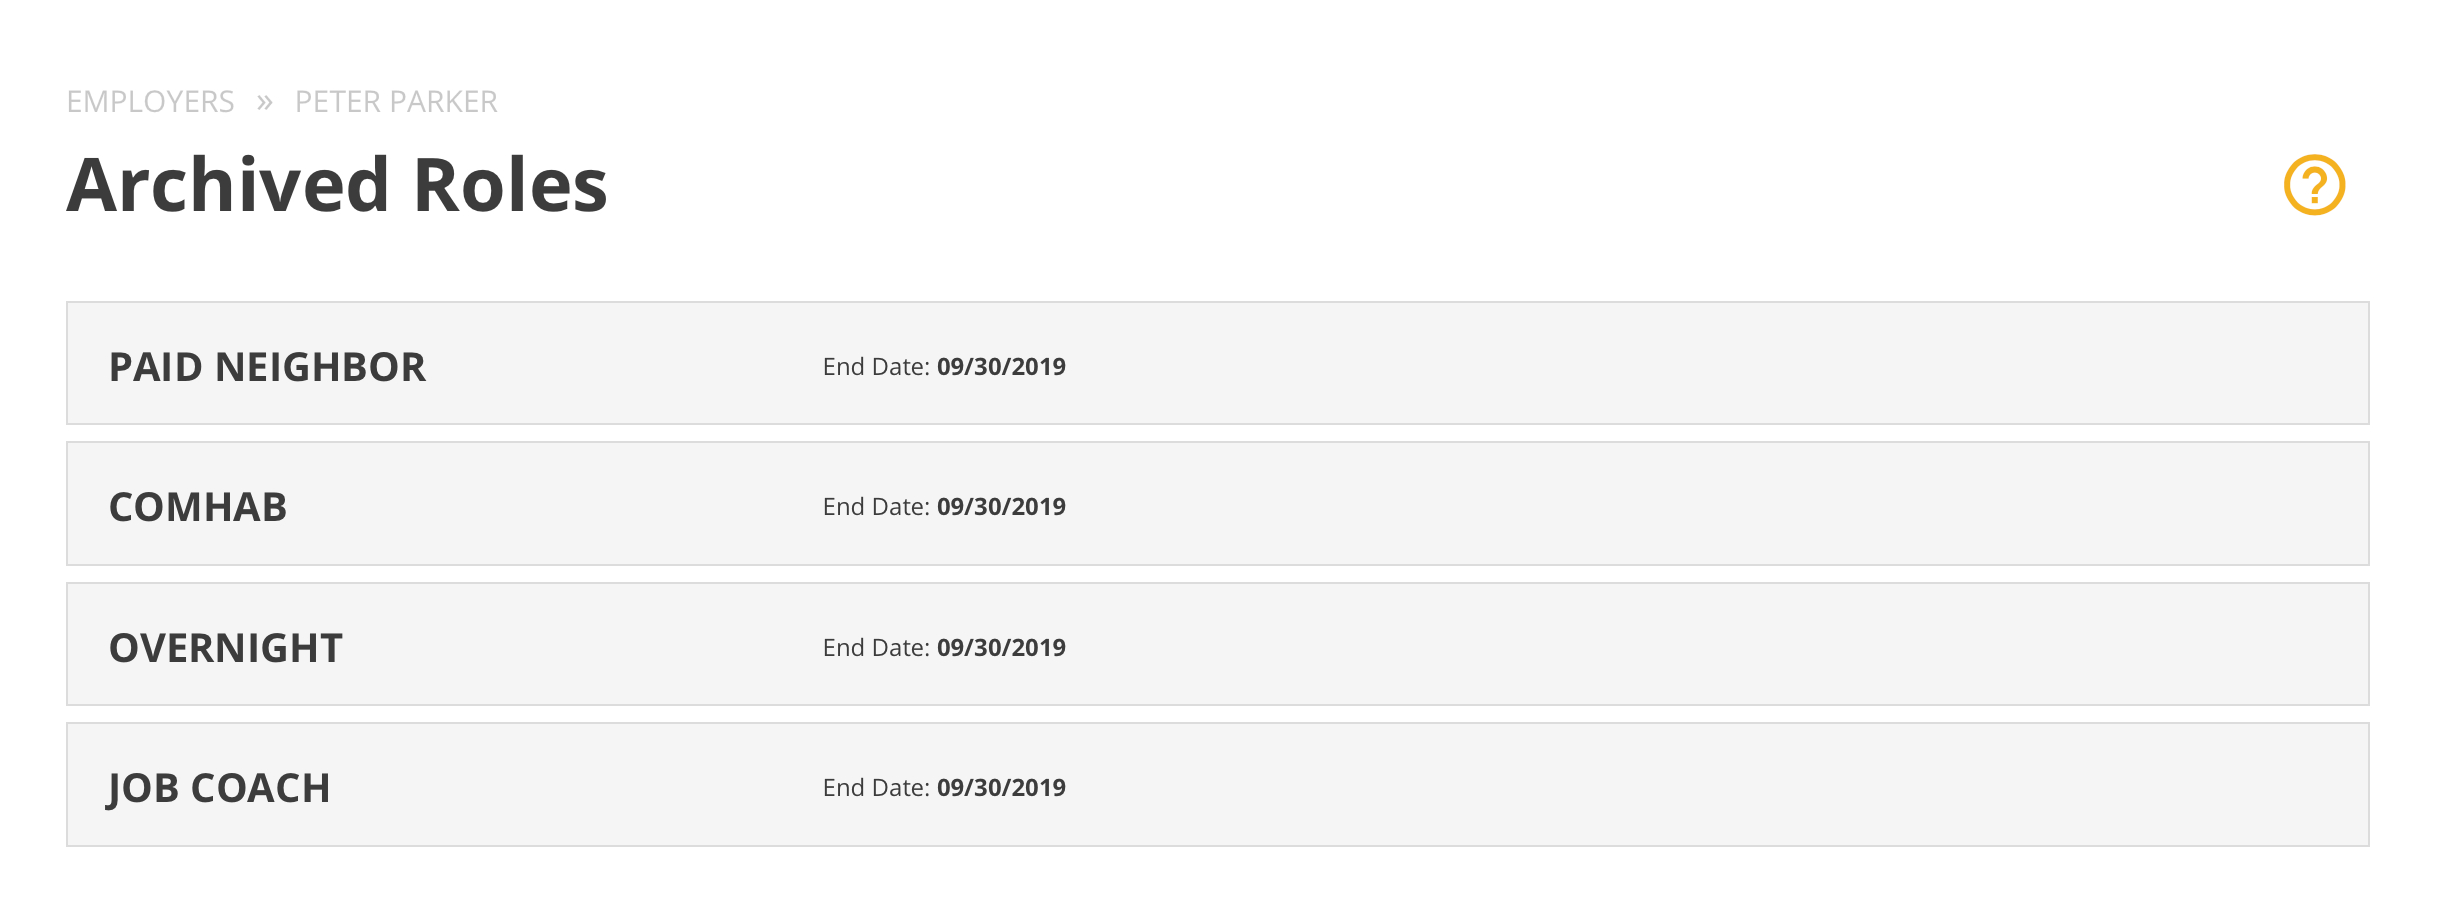
• Click Archived Roles to view your archived roles for the employer.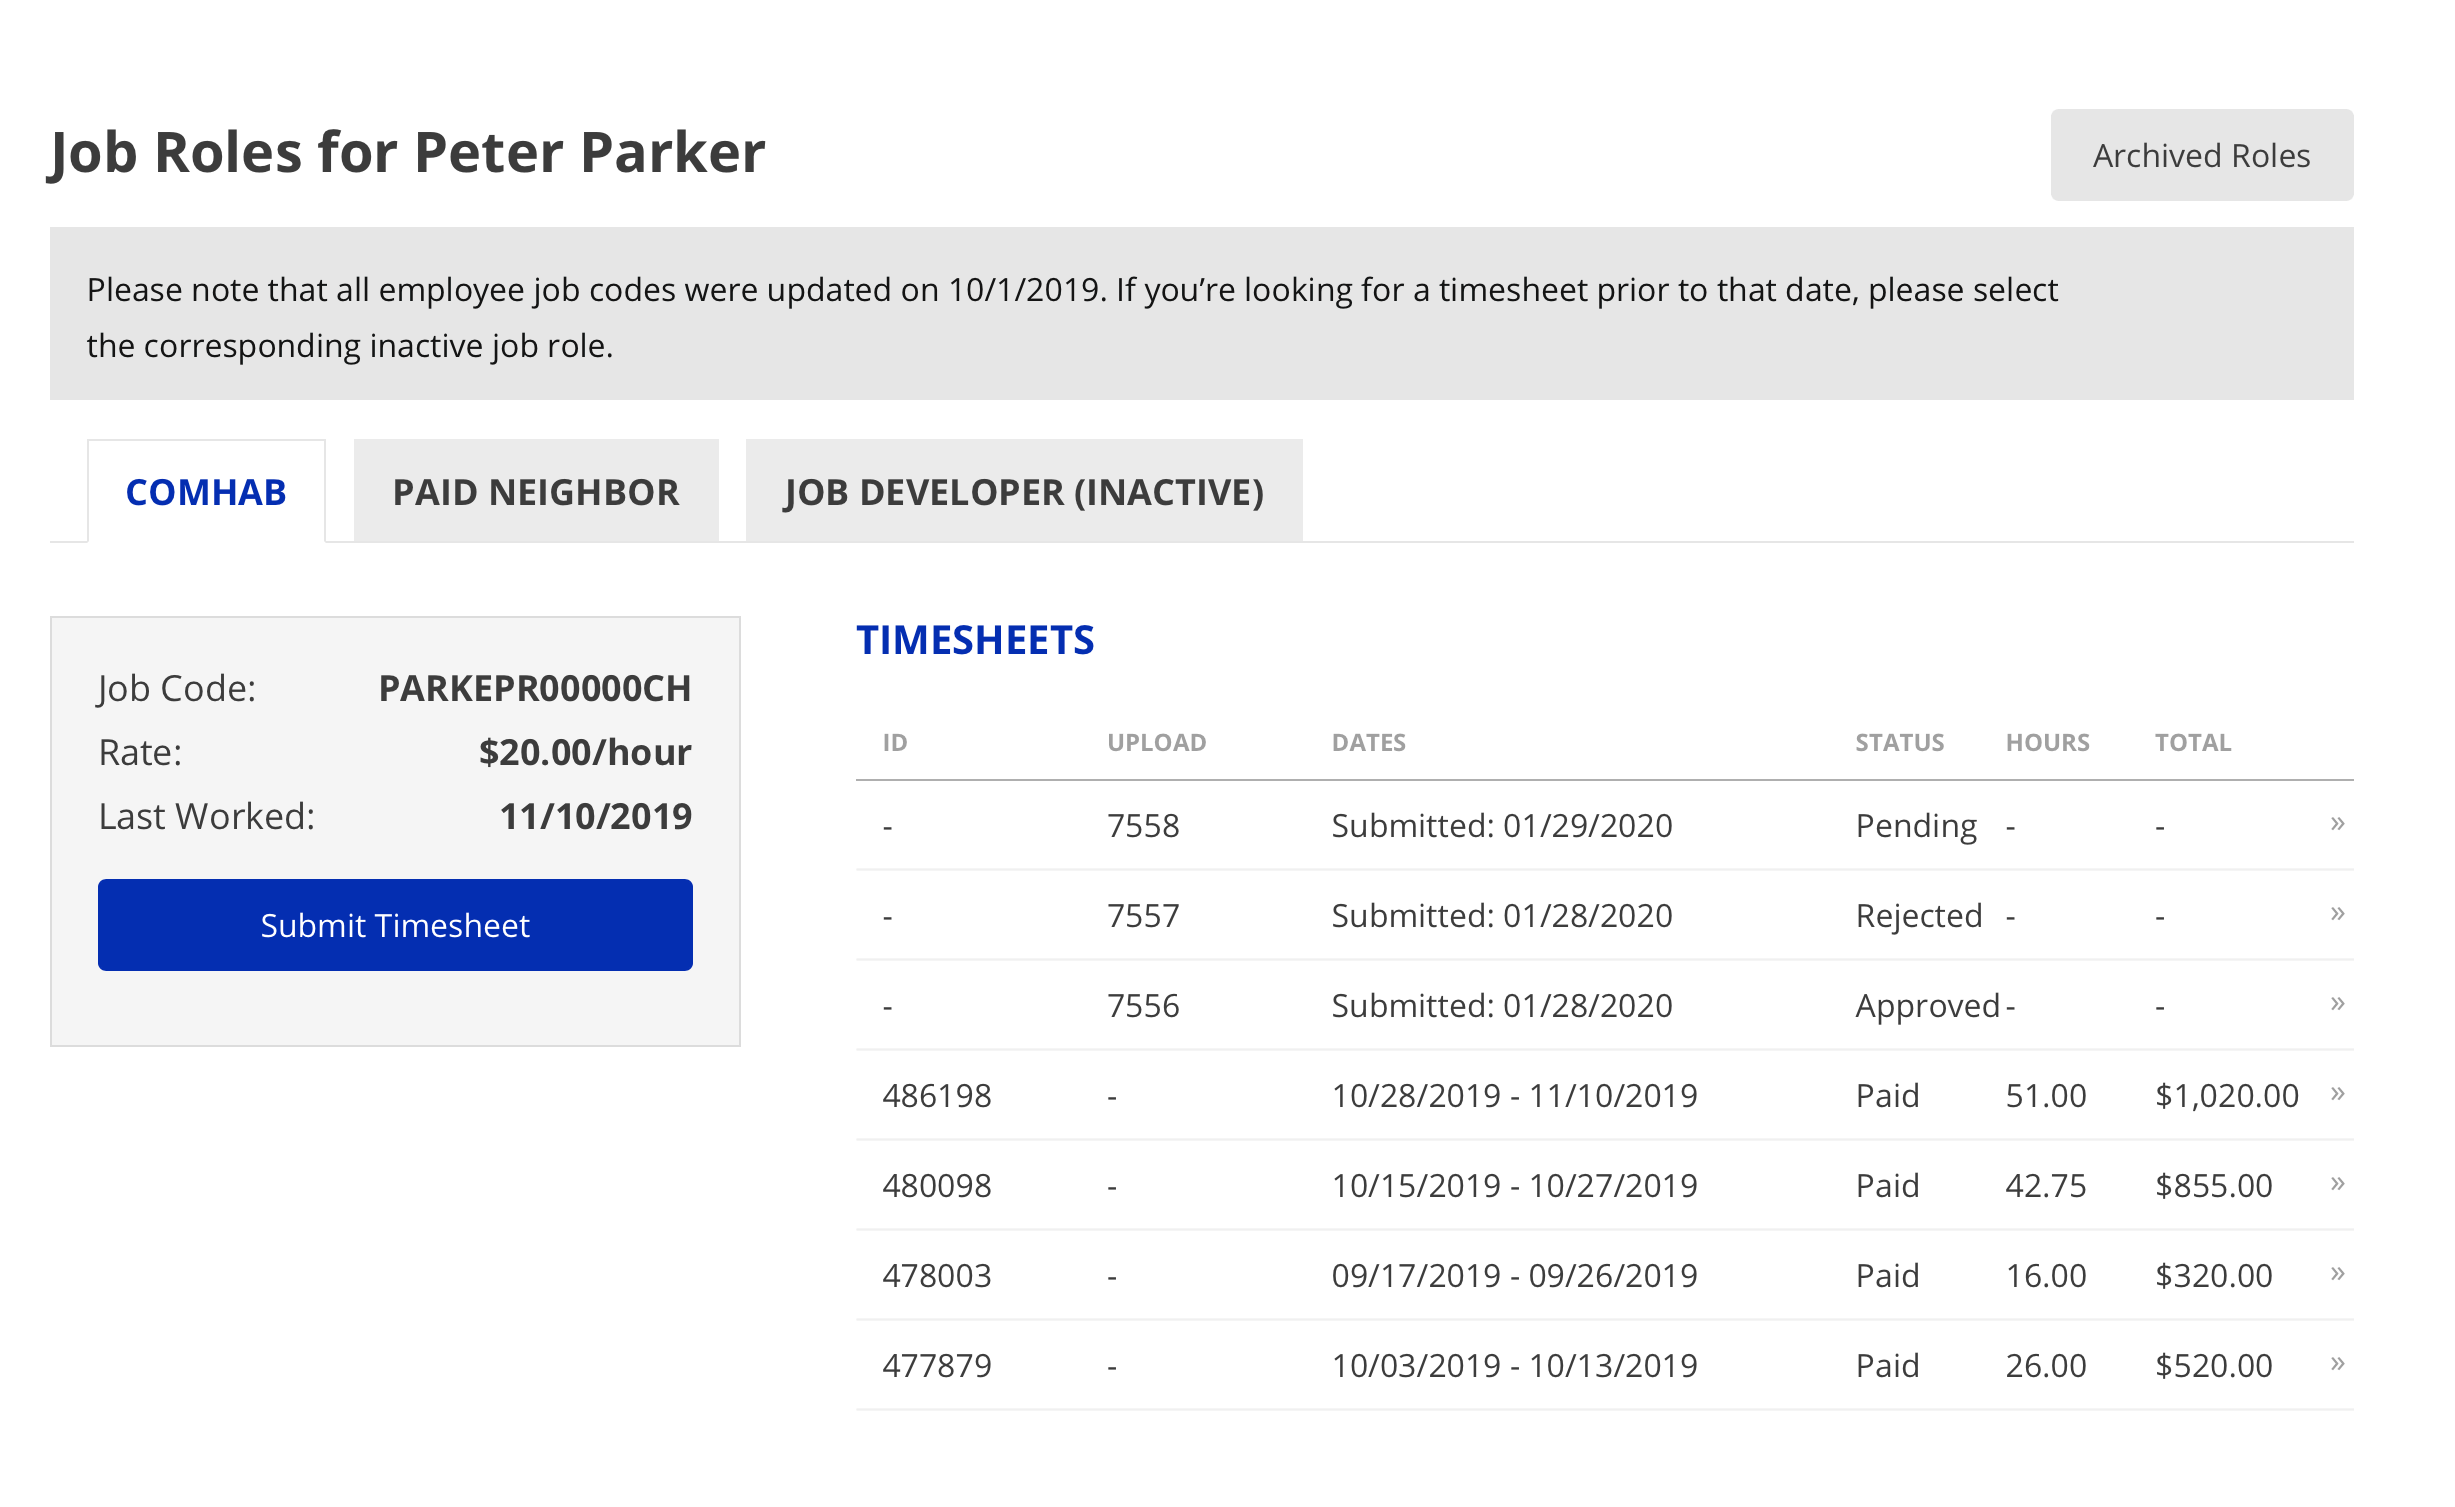
Archived Job Roles
When a job role ends, it will display as Inactive for 90 days. After 90 days, it will be moved to the Archived Roles section.
Timesheets
Under each job role is a list of your most recent timesheets for the employer. • Click on a timesheet to view its details.
• Click View All » to view all of your timesheets for the employer.
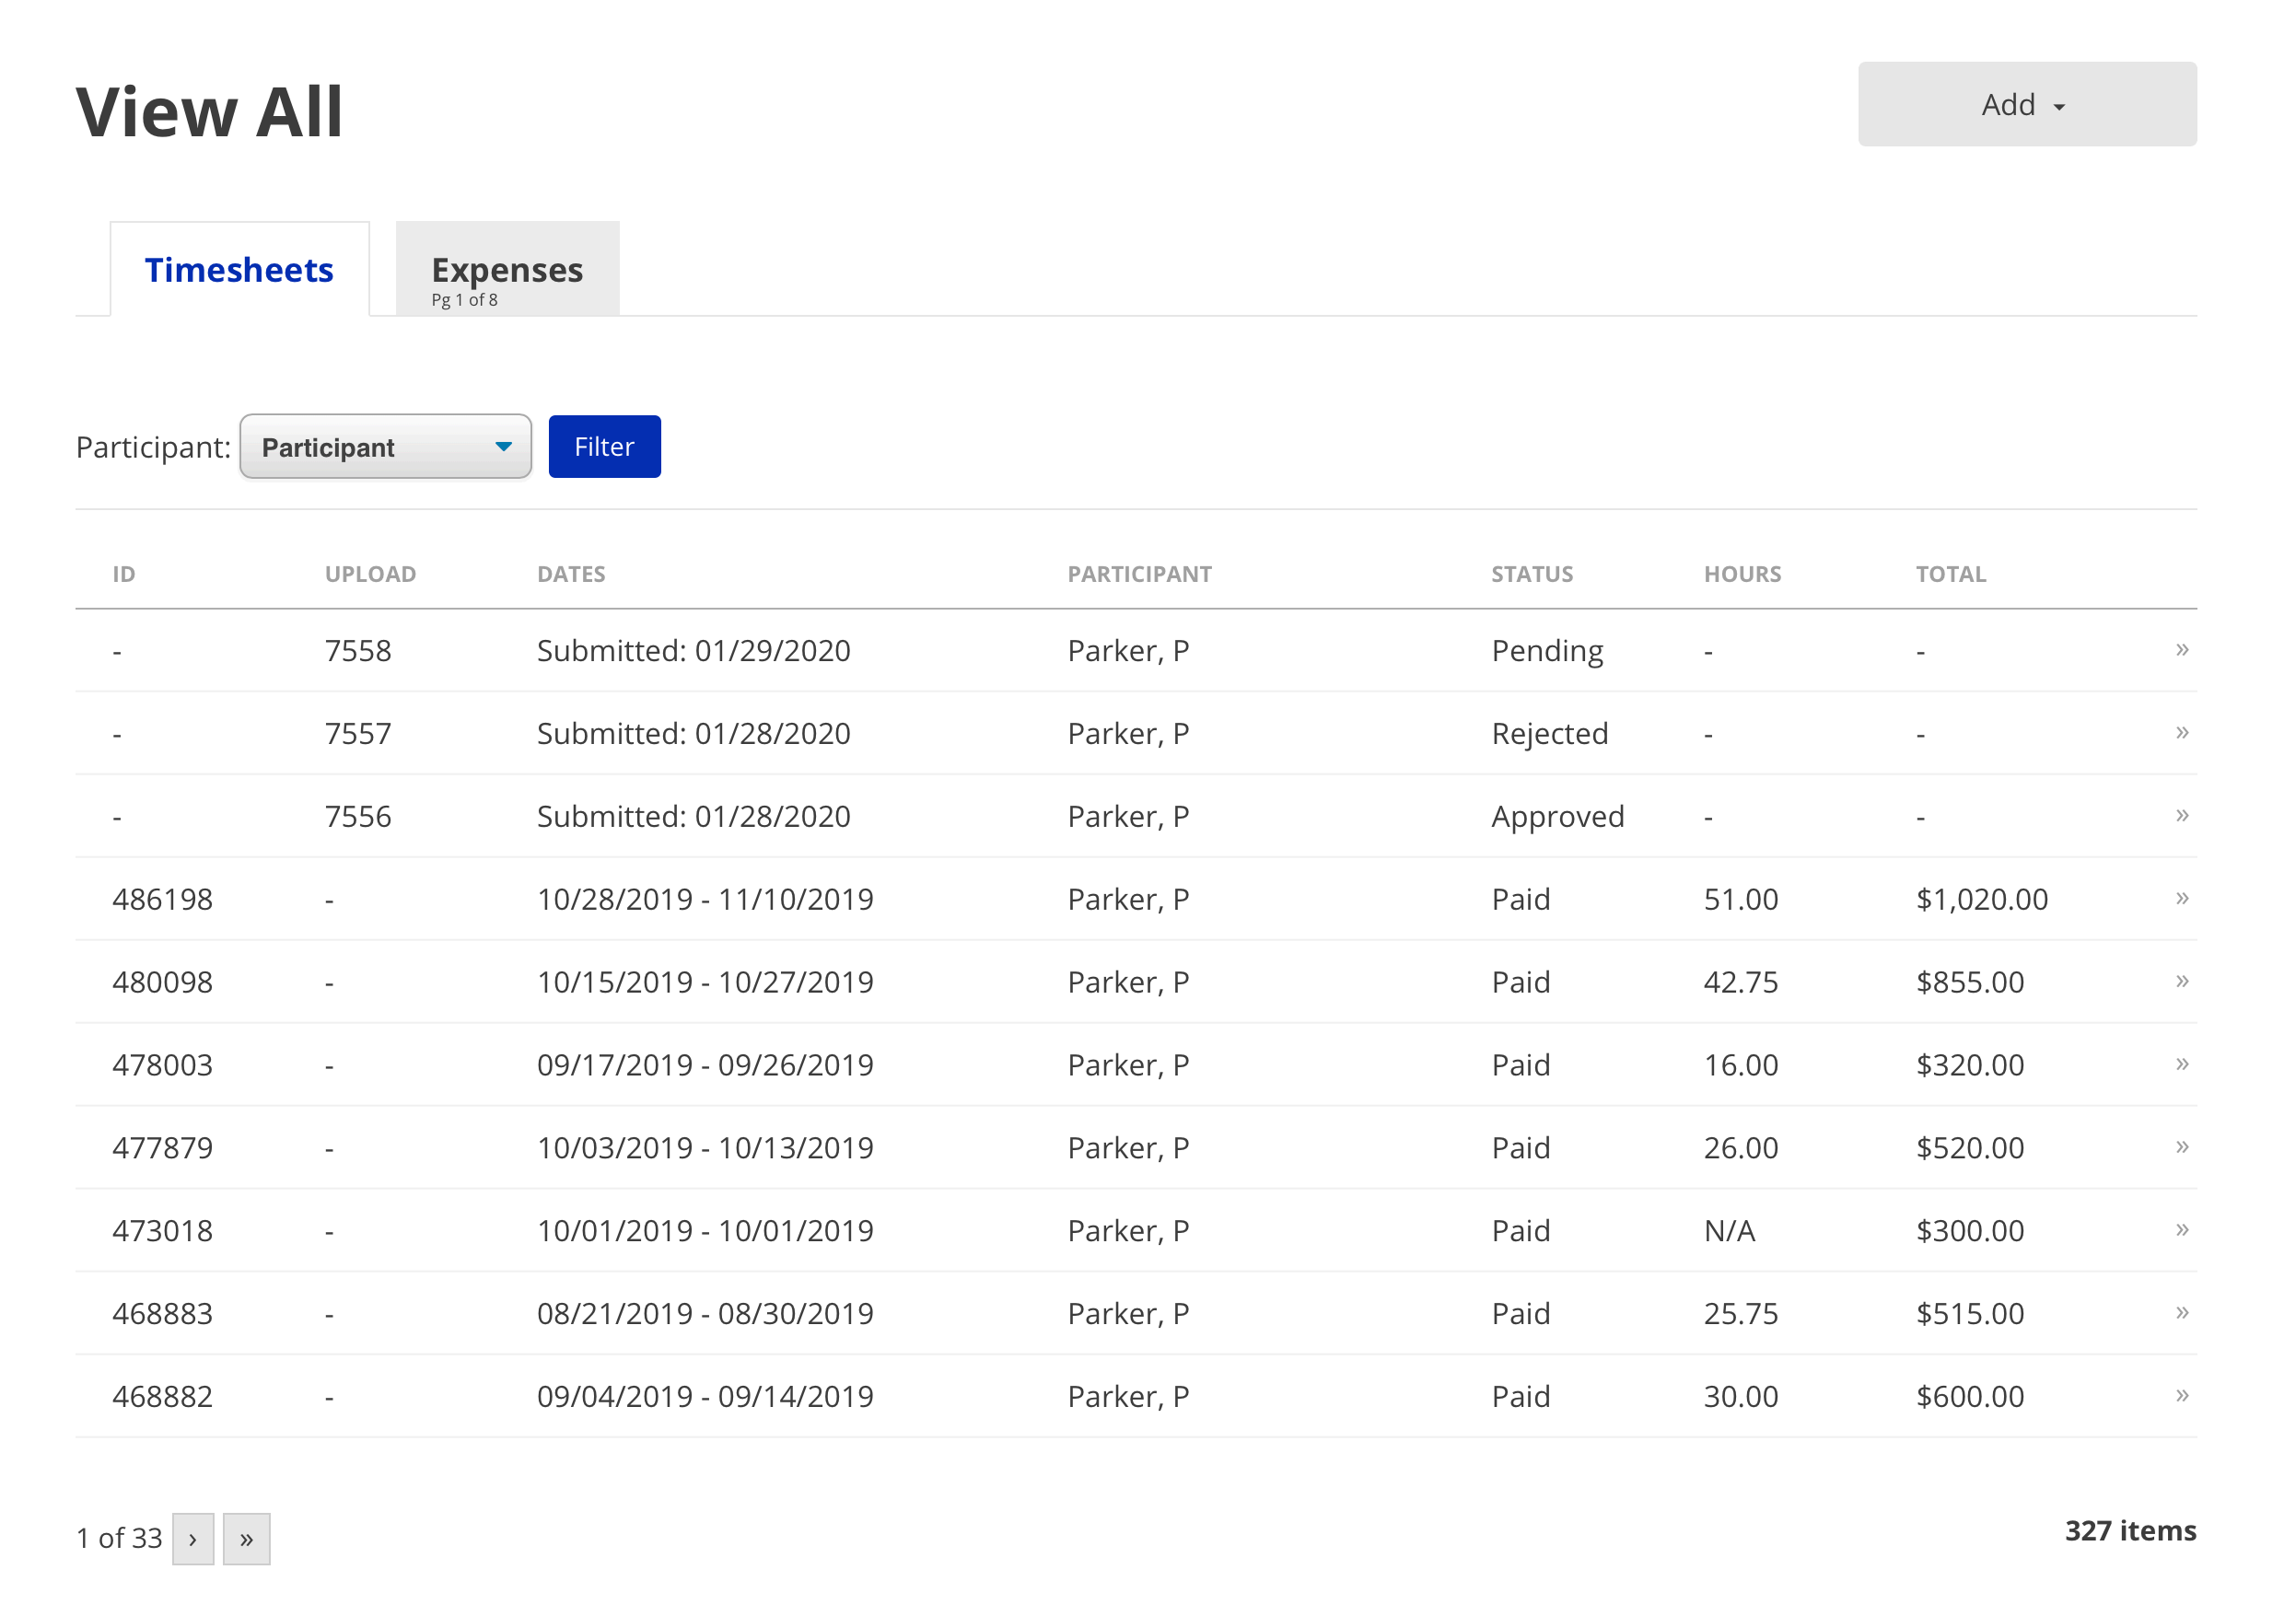
VIEW ALL TIMESHEETS & EXPENSES
To view a list of all of your timesheets or expenses for all employers:
- Select My Timesheets or My Expenses in the navigation menu.
- Use the filter dropdowns as necessary.
- Click on a timesheet or expense to view its detail.
VIEW TIMESHEET & EXPENSE DETAIL
View the detail of a timesheet or expense by selecting it from the Employer Detail page or the View All Timesheets & Expenses page.
Payment Breakdown
-
In some cases, ISS may not pay 100% of a submitted expense. If this happens, click the memo icon next to a line to view the comment.
-
If a timesheet upload is rejected, the reason for rejection will display on this page.
View and Download Documents
-
To view the documents submitted for a timesheet or expense (scanned timesheet, expense report, receipts, etc.), click View Document.
-
To download the images, click the Download button in the view window.
Request Documents
Due to the large number of documents associated with timesheets and expenses, some of them have not yet been moved to a location readily accessible to the portal. In this event, a Request Documents button will appear rather than the View All Images button. Clicking this button sends a request to the system for those specific documents to be retrieved and made available to the portal. The requested documents will be available in the portal no later than the next day.
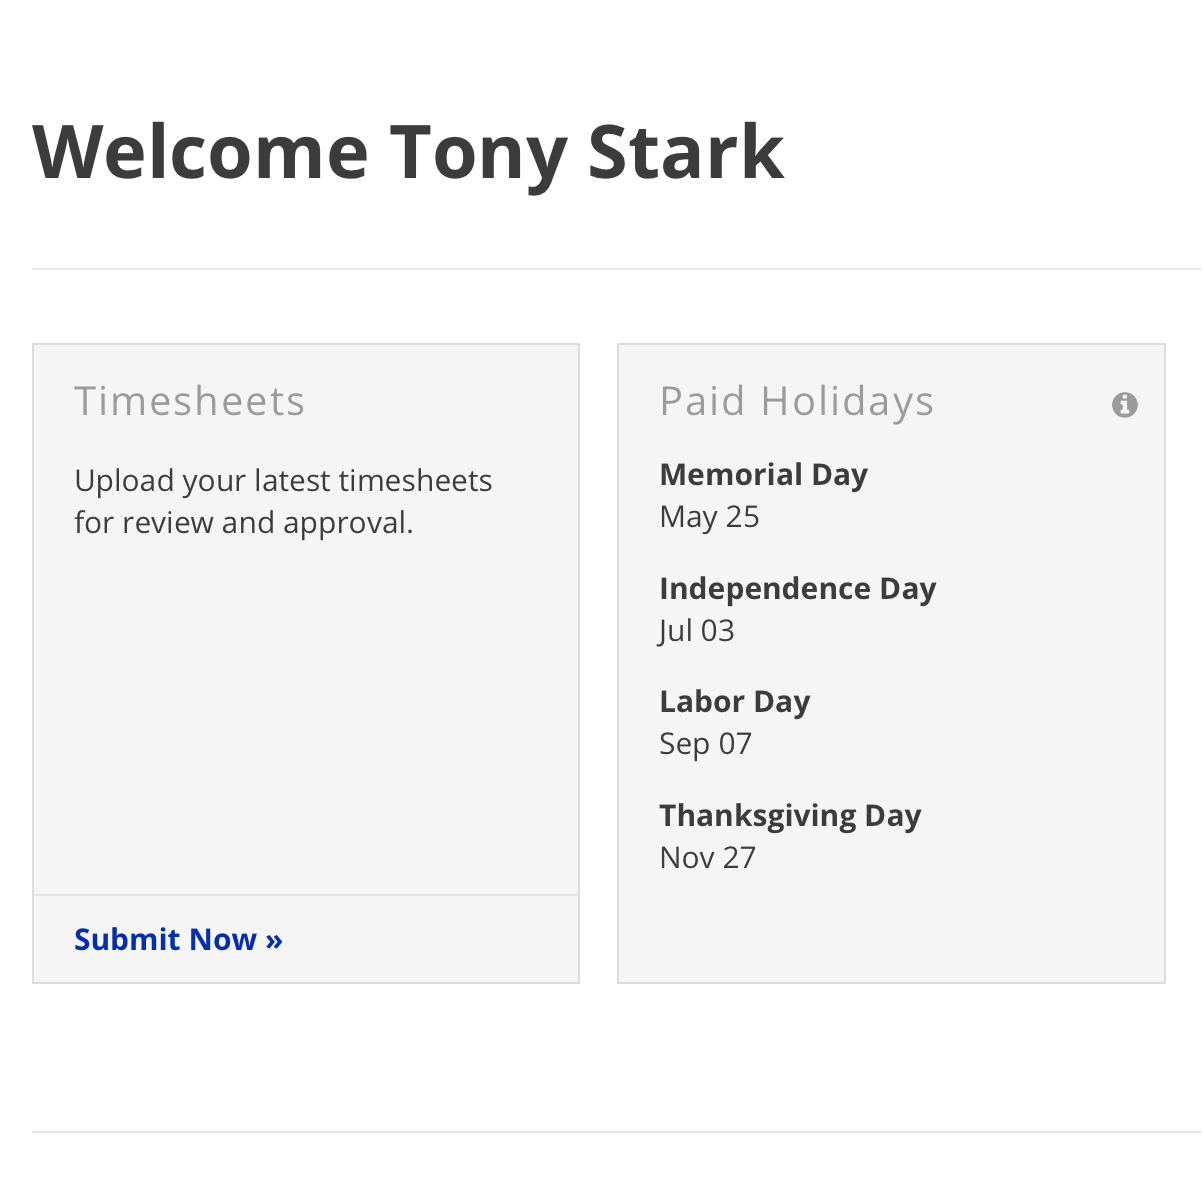
Paid Holidays
A list of upcoming ISS-approved paid holidays can be viewed on the home page in the Paid Holidays section. The list shows the upcoming few holidays.
Note: These paid holidays are only applicable to staff who work a minimum of 20 hours/ week.
FAQ
Updated 05/10/22.
My Info is incorrect. How do I fix it?
If you need to change information in your profile, contact People Services at ISS to make updates.
My employer’s information is incorrect. How do I fix it?
If you believe the information displayed for one of your employers is incorrect, contact ISS to make those changes.
I have a question about a timesheet or expense.
For expenses, contact Accounts Payable at ISS. For timesheets, contact Payroll. Be sure to have the Expense/Timesheet number, and/or the Upload ID for a timesheet that was uploaded.
Something about my job role/employment data is incorrect.
Contact People Services at ISS to resolve this issue.
I don’t see one of my employers.
Contact People ServicesPeople Services at ISS to resolve this issue.
I see an employer I don’t work for.
Contact People Services at ISS to resolve this issue.
I don’t see one of my job roles.
Contact People Services at ISS to resolve this issue.
I see an extra job role.
Contact People Services at ISS to resolve this issue.
Where did my job role go? I can’t find it.
If your job role does not display on the Employer Detail page, check on the Archived Roles page by clicking Archived Roles in the Job Roles section of that employer. If the job role does not appear in the Archived Roles section either, contact People Services at ISS.
Why is the Amount Submitted different from the Total Paid? (Reimbursement Expenses)
There are two main reasons why Amount Submitted and Total Paid for a Reimbursement Expense may not match.
-
All lines were paid. However, the sum that was submitted is different from the sum that ISS calculated.
-
Not all lines were paid. Certain lines may not be paid for various reasons. In these cases, click the memo button on the line to see a note about why the line was not paid.
Why is the Amount Submitted different from the Total Paid? (Mileage Expenses)
There are three main reasons why Amount Submitted and Total Paid for a Mileage Expense may not match.
-
The most common reason is a rounding issue. Lines of a mileage expense are calculated on a per-line basis (miles * rate). The totals of the lines are then summed. You may calculate a slightly different number if you multiply the rate by the sum of the miles.
-
The rate used on the submitted expense may have been the incorrect rate.
-
Certain lines may not be paid for various reasons. Click the memo button on the line to see a note about why the line was not paid.
UKG (Formerly UltiPro)
First Time Login
Updated 7/21/2022.
Initial Login & Creating your Password
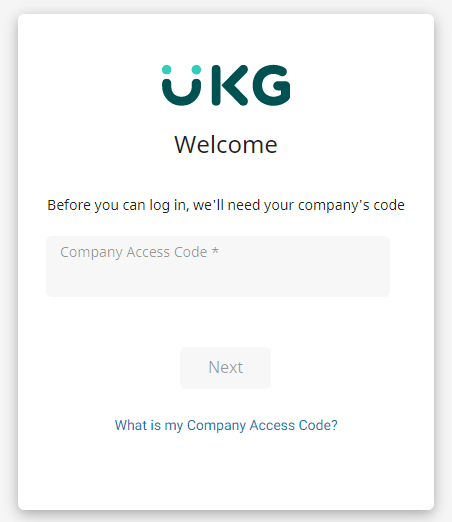
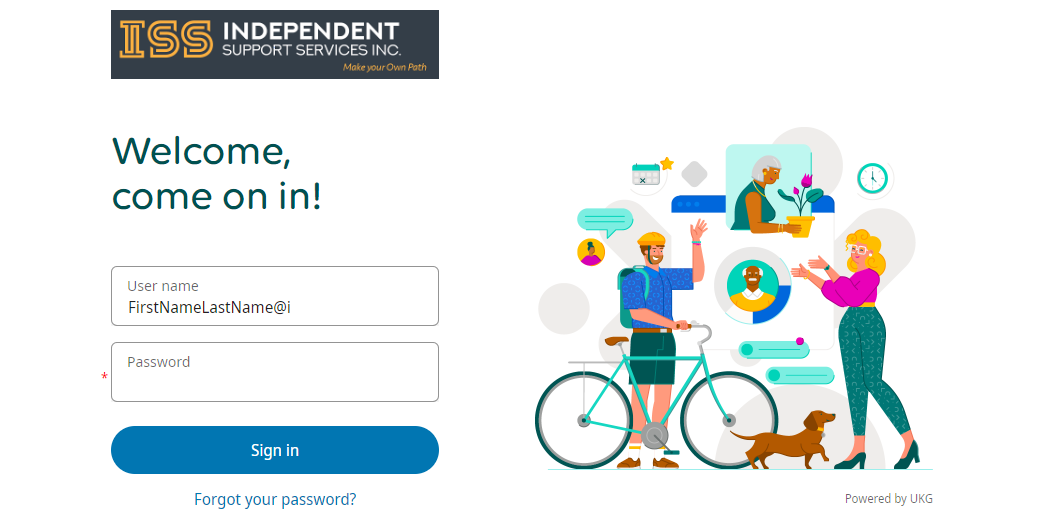
For first time users, visit https://ew33.ultipro.com/ and use the following information to login:
Company Access Code: ISS03
User Name: FIRSTNAMELASTNAME@I (I as in Igloo)
Password: your birthday (MMDDYYYY)
As an example, if my name were John Smith and my birthday was on 1/1/1999, my username would be JOHNSMITH@I and the password would be 01011999
Once you log in using these credentials, you will be prompted to create a new password. Your account can be accessed through the UKG app, the UKG widget on your portal home page or on the desktop website of ew33.ultipro.com
Company Access Code
First Time Logging in
When logging into UKG for the first time, you will be asked for a company access code. ISS' Company Access Code is ISS03
This is required only for the first time you login. However, if you ever delete the App, you'll have to put the code in again.
Updated 08/09/24.
How to Check your Pay Statements
Updated 10/19/2022.
Payday is Friday. UKG is the source for your paystubs. Please get them there. Paystub and check information on the Portal is not guaranteed to be displayed.
In your web browser, go to https://ew33.ultipro.com/ and log in using your user name and password.
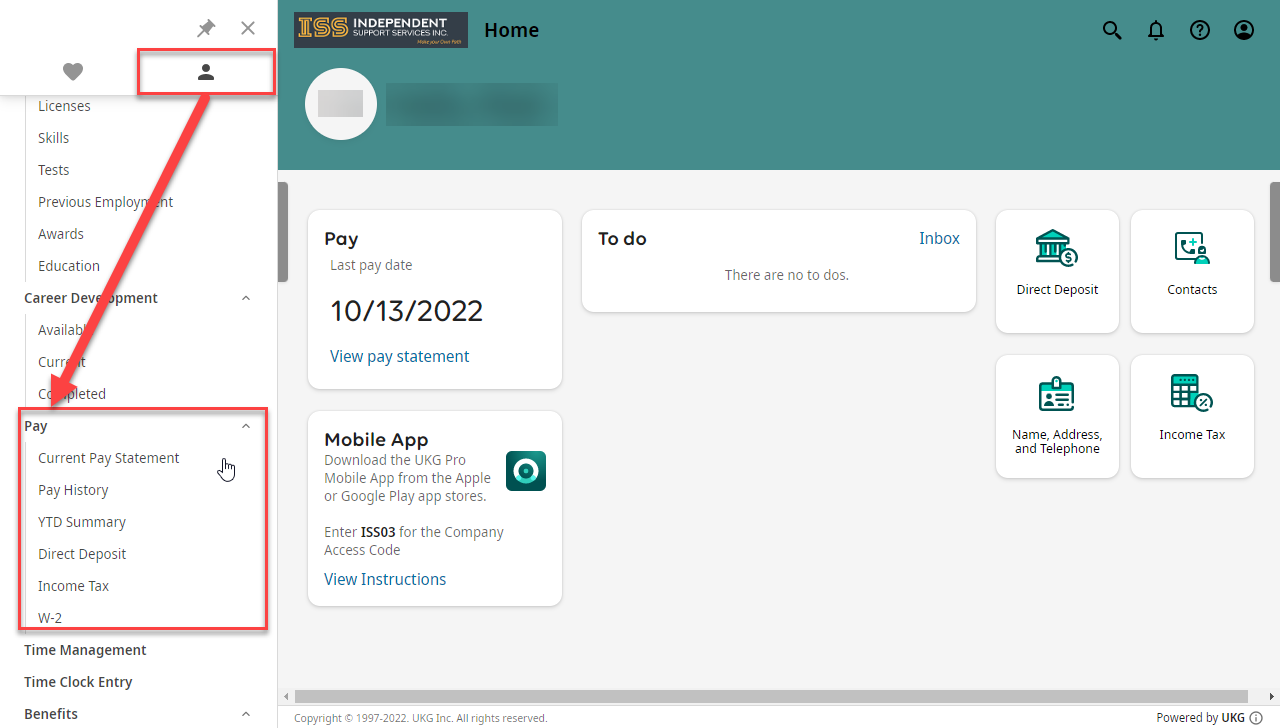
- Current Pay Statement – This allows you to see the most recent Paystub. Alternatively, you can quickly access this by clicking on “View pay statement” link in the Pay section of your homepage.
- Pay History – This allows you to see everything, going as far back as 2016.
How to Find Your W-2
Updated 7/21/2022.
Login to UKG
Login to UKG by going to https://ew33.ultipro.com/ and using your username and password.

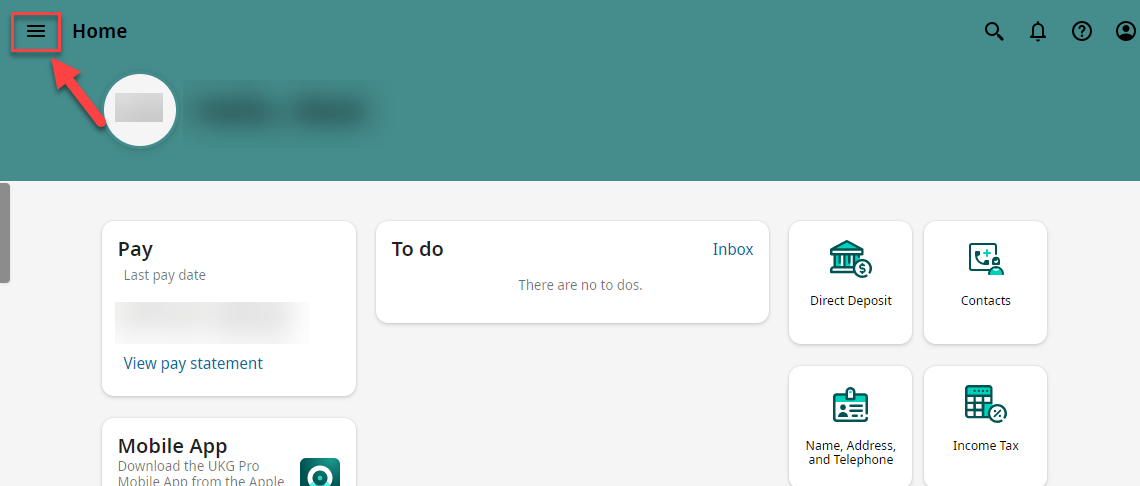
Access W-2 from the Menu

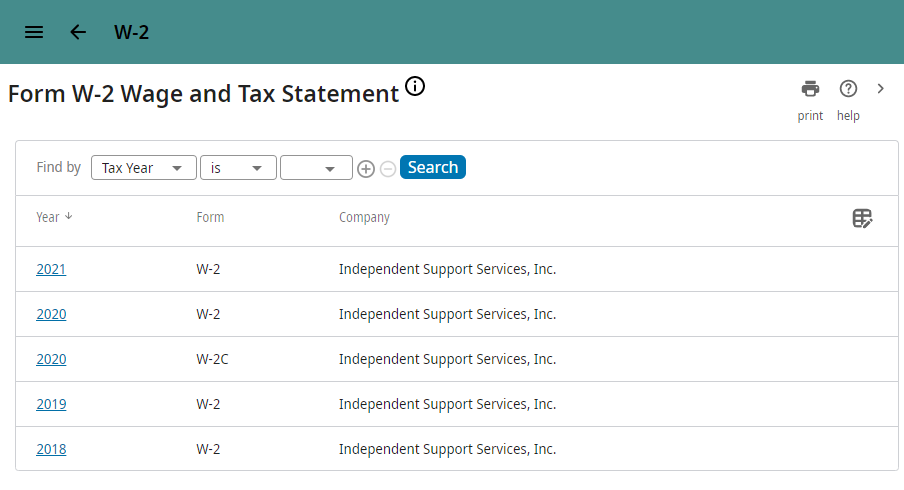
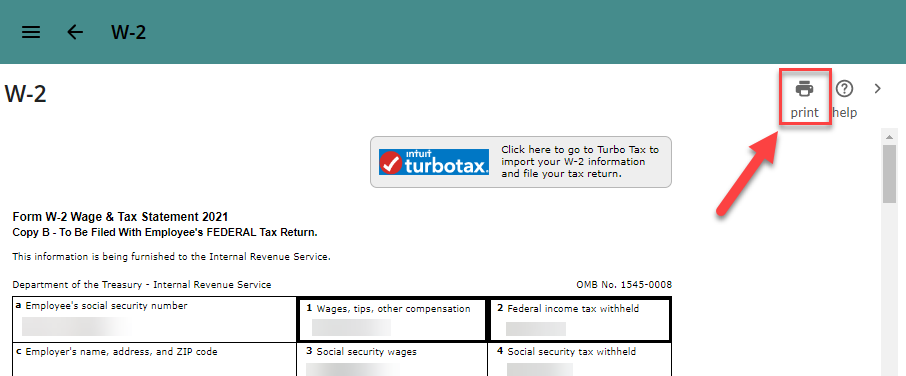
Selecting the Year & How to Print
Here, you can click on the year of the W-2 you are looking for to access it. You can also print the document by clicking on the Print Icon, at the top right of the screen.
Update Contact Info on UKG
Updated 05/10/22.
To update any of your contact information on UKG (formerly UltiPro), please email peopleservices@issny.org with your full name, what is being changed, and what it should now be.
For legal name changes, you must provide a copy of your new Social Security Card.
FAQ
Updated 10/19/2022
How can I reset my password?
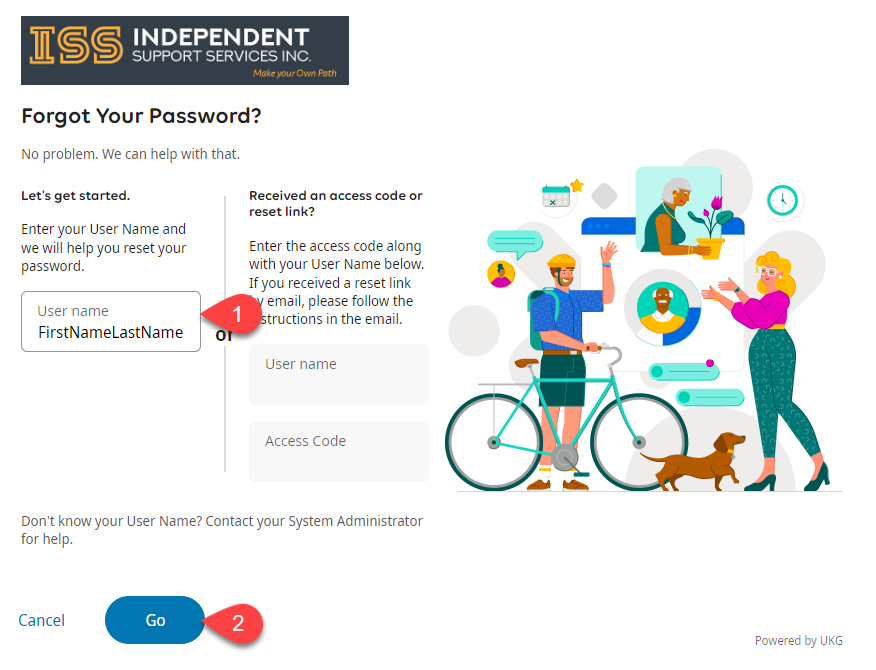
At the login page, click on the “Forgot your password?” link
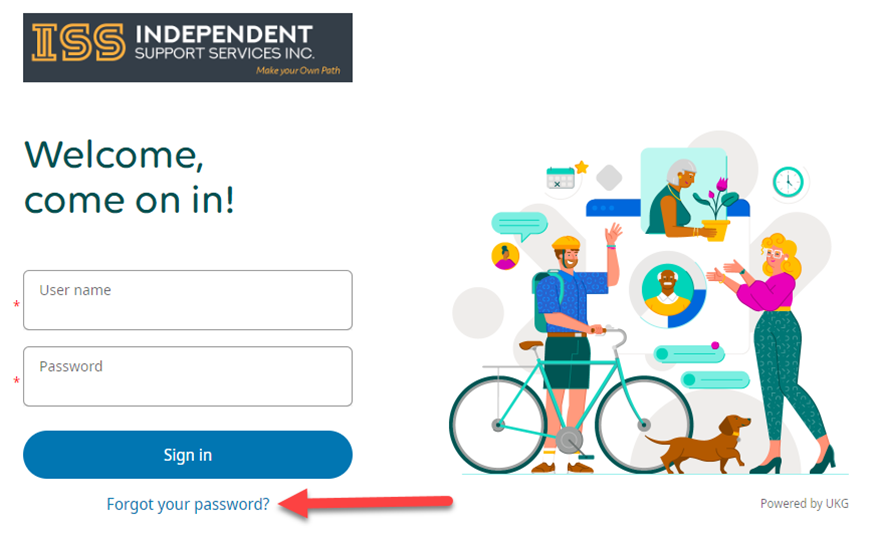
You will then be prompted to enter your User Name. Enter your user name and click "Go". You will then be asked to answer the security questions you made when your account was initially set up. When the security questions are answered correctly, you will be prompted to create a new password.
User Names are created using the staff’s first name followed by their last name then “@i”. For example, a staff named “Joe Dirt” would be “JoeDirt@i”
If you have further issues with this, please reach out to staffsupport@issny.org
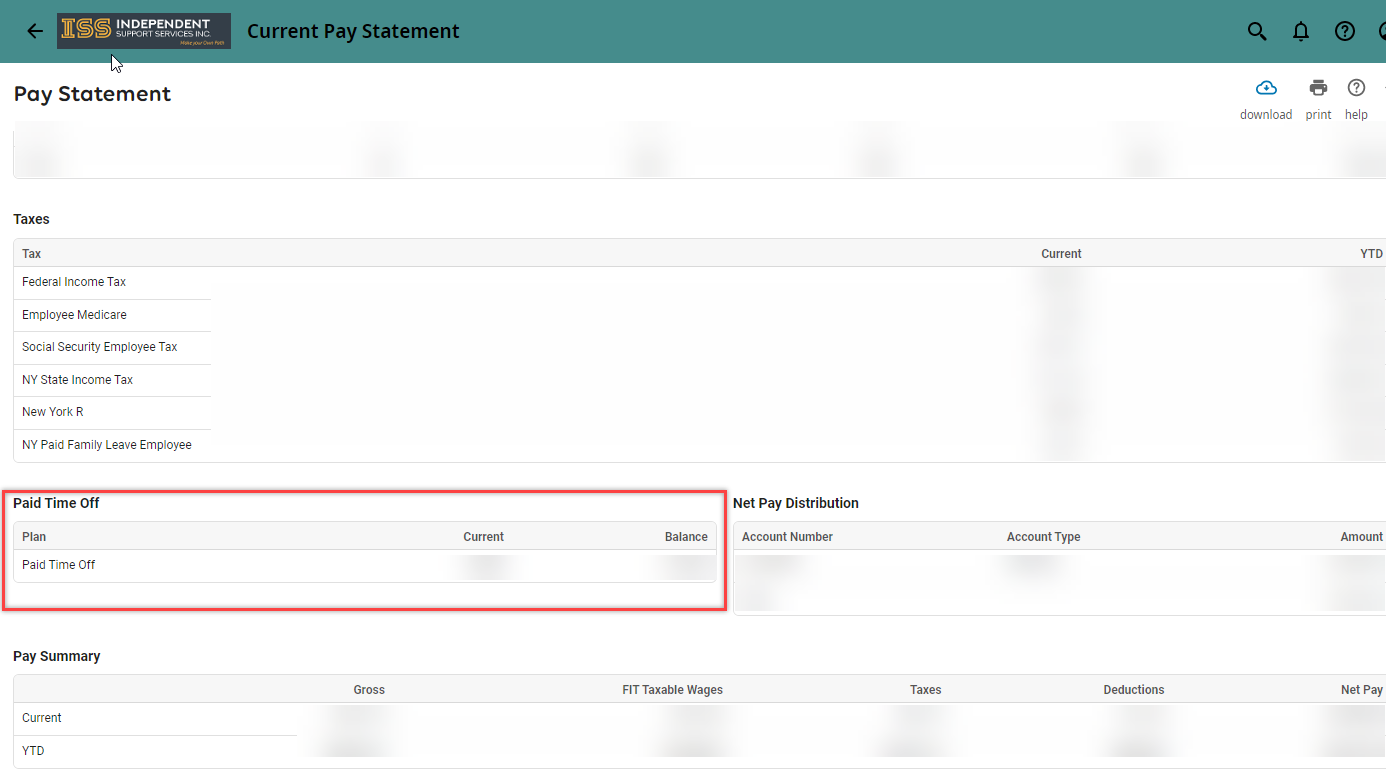
Where can I find my Paid Time Off (PTO)?
Accumulated Paid Time Off can be found on your Pay Statement in the Paid Time Off section. To learn how to access your Pay Statement, please see our help page here: How to Check your Pay Statements